


Special offers from our partners!

Find Replacement BBQ Parts for 20,308 Models. Repair your BBQ today.

15
JNR & WNK Assembly Instructions
Grill Head Assembly
Instructions
• The grill head bottom must be attached to
the mounting before starting.
• It is easiest to work with the grill in the up-
right position.
• The difference between the JNR and the
WNK is the WNK is larger, has two side
shelves and the warming rack fastens dif-
ferently.
• Leak test all gas connections before
using.
• Caution: Combustible material should
never be within 24 inches of the top, bot-
tom, back or sides of your MHP Gas Bar-
becue Grill.
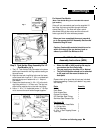
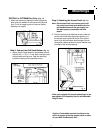
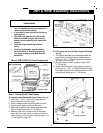
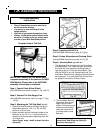
View of JNR & WNK Grill Head Components
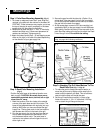
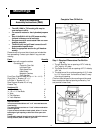
Step 1: Control Panel & Heat Shield
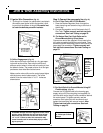
A.
Attaching Heat Shield and Control Panel
(Fig. 19)
1. Insert the ¼ - 20 x ¾" Hex bolts through the two
holes in the front of control panel.
2. Press a keeper washer to hold the bolts in place.
3. Slip the control panel shield onto the bolts.
4. Attach the complete control panel assembly to the
front of the grill head with a ¼ - 20 Kep nut.
5. Make sure the valve orifices on the control panel
aligns with the burner venturi correctly and that the
venturi tubes go over the valve orifices at least ¼" to
½" (see fig. 22 on page 16).
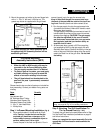
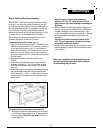
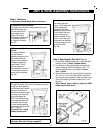
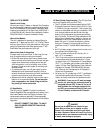
B. Connecting the Control Panel Support Brackets
(Fig. 20)
1. Two support brackets are connected beneath the
control panel to the grill head for added support.
Push a ¼ - 20 x 1¼" Phillips head bolt through the
grill head from the inside.
2. Slip the support bracket in position, fasten with a
¼ - 20 Kep nut.
3. Attach the control panel to the support bracket by
pushing up a ¼ - 20 x ½" Phillips head bolt through
the support bracket and through the lower lip of the
control panel, fasten with a ¼ - 20 Kep nut.