


Special offers from our partners!

Find Replacement BBQ Parts for 20,308 Models. Repair your BBQ today.

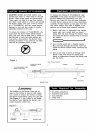
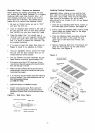
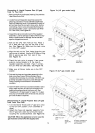
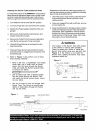
Connecting A Liquid Propane Gas (LPgas) Figure 7a (LP gas model only)
Tank To Your Grill
1. Remove the Pull-out Grease Draining Trayw_th the
Heat Shieldfrom Grill.
2. Locate hose and regulator assure bly packed for
shipping purposeson front underside of grill head.
Remove fastening band. Push assembly to back of
grill and pull down to connect to tank valve. Before
connecting, check valve and assembly threads to
be sure they match. (Type 1 connection per ANSI
Z21.58b-2002). See Figure 7b.
3. Inspect thevalve connection port ofthe regulator
assembly. Look for damage or debris. Remove any
debris. Inspect hose fordamage. Never use dam-
aged or plugged equipment.
4. Pull out the LPG Tank Pull-out Tray. Place a
20 ib tank with foot ring into the hole in the
tray. See Figure 7a. Make sure the tank valve
is in the OFF positen.
5. Align the tank so the Tank Valve faces the rear
right corner of cabinet. Use the 5i16"x89mm Wing
Bolt to secure gas tank from rear of tray.
See Figure 7a.
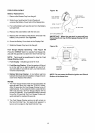
6. Check the tank valve to ensure it has proper
external mating threads to fit the hose &
regulator assembly provided (Type 1 connec-
tion per ANSI Z21.58b-2002). See Figure 7b.
7. Make sure all Burner knobs are in the OFF
position.
8. Cor_nect the hose and regulator assembly to the
tank valve (See Figure 7b) Hand tighten Quick
Coupling Nut clockwise to a full stop. DO NOT use
a wrench to tighten because it could damage the
Quick Coupling Nut and result in a hazardous
condition.
9. Open the tank valve fulty (counterclockwise). Use a
soapy water solution to check all connections for
leaks before attempting to light your gdtl. See
"Checking for LP Gas Leaks" on page 15. If a leak
is found, turn the tank valve off and do not use your
grill until the leak is repaired.
FRONT
DOOR
TANK
/
TANK PULL-OUT
TRAY
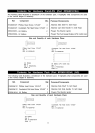
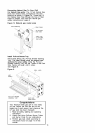
Figure 7b (LP gas model only)
5/18"_9mm
WING BOLT
GRILL HEAD
Disconnecting A Liquid Propane Gas (LP gas)
Tank From Your Grill
1. Turn the Burner Knobs and LP gas tank valve
to the full OFF position. (Turn clockwise to
close.)
2. Detach the hose and regulator assembly from
the LP gas tank valve by turning the Quick
Coupling Nut counterclockwise. See Figure 7b.
CAUTION: When the appliance is not in use, the
gas must be turned off at the supply tank.
13
TANK P
TRAY
QUICK
COUPUNG
NUT
]
ALREADY CONNECTED
TO ADAPTORUNDER
SbDE BURNER.