


Special offers from our partners!

Find Replacement BBQ Parts for 20,308 Models. Repair your BBQ today.

27
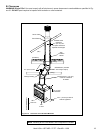
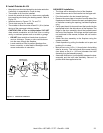
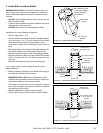
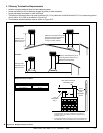
Figure 8.4 Assembling Chimney Sections
• Support the pipe during construction and check to be
sure inadvertent loading has not dislodged the chimney
section from the fi replace or at any chimney joint.
• Attach a straight chimney section or an offset to the top
of the fi replace.
• Place inner fl ue to the inside of the chimney section below
it. Place the outer casing outside the outer casing of the
chimney section below it. Refer to Figure 8.4.
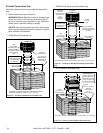
NOTICE: Chimney sections cannot be disassembled
once locked together. Plan ahead!
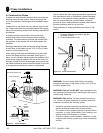
• Lock chimney sections and/or offsets/returns together by
pushing downward until the top section meets the stop
bead on the lower section.
• Pull on the top section to make sure it is fully engaged
and will not separate.
• You may use #6 or #8 sheet metal screws no longer than
1/2 in. (13 mm) to fasten chimney sections together. Do
NOT penetrate inner fl ue.
WARNING! Risk of Fire! You MUST use screws (pro-
vided) to fasten offset/returns to chimney sections to
keep the chimney parts from twisting. Failure to do so
could cause fi re.
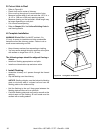
• Fasten offset/returns to chimney sections. Insert the
screws (provided) through the predrilled holes. Do NOT
penetrate inner fl ue.
• Secure chimney returns with hanger straps provided;
fasten to studs or joists.
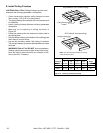
• Vertical straight runs of chimney must be supported every
35 ft (10.7 m).
C. Assemble Chimney Sections
WARNING! Risk of Fire! DO NOT install substitute or
damaged chimney components.
• Use only those components described in this manual.
Substitute or damaged chimney components could impair
safe operation and cause overheating and fi re.
D. Install Chimney Air Kit
• Required in Canada.
• Follow instructions provided with this accessory.
Heat & Glo • HST-42D • 27177 • Rev AB • 11/08