


Special offers from our partners!

Find Replacement BBQ Parts for 20,308 Models. Repair your BBQ today.

Outdoor Lifestyles by Hearth & Home Technologies Inc. • 4070-300 Rev C • 4/11
15
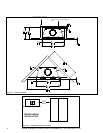
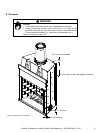
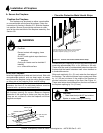
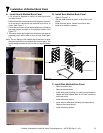
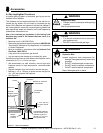
B. Assemble the Chimney Sections
install substitute or dam-
aged chimney components.
• Use only those components described in this manual.
Substitute or damaged chimney components could impair
safe operation and cause overheating and re.
• Support the pipe during construction and check to be sure
inadvertent loading has not dislodged the chimney section
from the replace or at any chimney joint.
• Attach the transition section to the top of the replace.
• Place inner ue to the inside of the chimney section below
it. Place the outer casing outside the outer casing of the
chimney section below it. Refer to Figure 5.1.
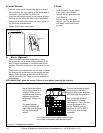
• Lock chimney sections and/or offsets/returns together by
pushing downward until the top section meets the stop
bead on the lower section.
• Pull on the top section to make sure it is fully engaged
and will not separate.
• You may use #6 or #8 sheet metal screws no longer than
1/2 in. (13 mm) to fasten chimney sections together. Do
NOT penetrate inner ue.
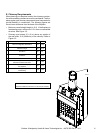
• Fastenoffset/returnstochimneysections.Insertthe
screws(provided)throughthepredrilledholes.Do
NOTpenetrateinnerue.
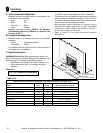
• Secure chimney returns with hanger straps (provided);
fasten to studs or joists.
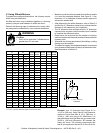
• Vertical straight runs of chimney must be supported every
35 ft (10.7 m).
Fiqure 5.1 Assembling Chimney Sections