Special offers from our partners!

Find Replacement BBQ Parts for 20,308 Models. Repair your BBQ today.

13
INSTALLATION
GAS HOOKUP
GAS REQUIREMENTS
Verify the type of gas supply to be used, either natural or LPG, by checking the gas type label on rear panel of the
unit and the serial label behind the drip pan handle on the right-hand side. For gas consumption data, see the
rating label on the rear panel of the unit. Never connect an unregulated gas line to the appliance. You must use
the gas regulator provided with the unit, even if the supply is controlled.
If the unit is being connected to a reticulated gas supply, an installer-supplied gas shut-off valve must be in-
stalled in an easily accessible location. All installer supplied parts must conform to local codes, or in the absence
of local codes, with the the requirements of AS/NZS 5601.1:2010 and any other applicable statutory regulations.
All pipe sealants must be an ap proved type and resistant to the actions of LPG gases. Never use pipe sealant on
flare fittings. All gas connections should be made by a qualified gas fitter and in accordance with local codes
and ordinances. In the absence of local codes, the installation must comply with the the requirements of AS/
NZS 5601.1:2010 and any other applicable statutory regulations. Gas conversion kits are available from Customer
Care. See section ‘Service’ for contact details. When ordering gas conversion kits, have the model number, and
the type of gas (natural or LPG) from your grill.
The appliance and its individual shut-off valve must be disconnected from the gas supply piping system dur-
ing any pressure testing of that system at test pressures in excess of 3.5 kPa (1/2 PSIG). The appliance must be
isolated from the gas supply piping system by closing its individual manual shut-off valve during any pressure
testing of the gas supply piping system at test pressures equal to or less than 3.5 kPa (1/2 PSIG).
NATURAL GAS HOOK UP:
Important!
THIS TYPE OF CONNECTION SHOULD BE PERFORMED BY A CERTIFIED OR LICENSED
GAS FITTER ONLY.
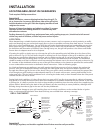
Connection: Grills set for use with Natural gas come with an NG regulator assembly which has a short section of
hose already connected. The regulator has a test point. The regulator assembly is not connected to the appliance.
A certified gas fitter needs to connect the appliance to the gas supply. Shut-off valve and Gas fittings for rigid
piping connection are not supplied with the appliance -- they must be provided by the installer.
For built-in installation with connection to Natural Gas:
1. Attach regulator hose assembly to the appliance using the 3/8” SAE 45 Flare connection.
2. Plumb from the female 1/2” BSP side of the regulator to gas supply.
3. Do leak test.
4. After the connection is completed, turn the shut-off valve on and turn the burner control valves on the unit
tothe “HI” position for about 20 seconds to allow the air in the system to purge, turn valves off and wait 5 minutes
before attempting to light the burners.
For units mounted on a mobile cart and being connected to a reticulated supply of Natural gas: a special ‘quick
connect’ flexible hose accessory kit must be purchased separately by the installer from DCS by Fisher & Paykel.
See section ‘Service’ for contact details.
1. Purchase, upon request from the customer, the ‘quick connect’ flexible hose accessory kit - 1/2” BSP connec-
tion (for the regulator) and a quick disconnect flexible hose (for connection to house supply).
2. If not already done, attach the regulator (1kPa) hose assembly to the appliance using the 3/8” SAE 45 Flare con-
nection.
3. Thread the kit-supplied quick connect hose into cart and attach hose accessory 1/2” BSP male connection to
female 1/2” BSP side of the regulator.
4. Do leak test.
5.After the connection is completed, turn the shut-off valve on and turn the burner control valves on the unit to
the “HI” position for about 20 seconds to allow the air in the system to purge, turn valves off and wait 5 minutes
before attempting to light the burners.
6. Disconnect hose, then coil up hose and hang on exterior hook at the back of the cart.


