


Special offers from our partners!

Find Replacement BBQ Parts for 20,308 Models. Repair your BBQ today.

12
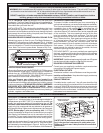
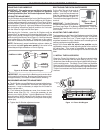
FEATURES AND ACCESSORIES
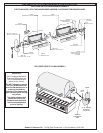
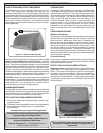
USING THE COOKING GRILL LIFTER
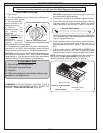
Hold the Grill Lifter by gripping the center section with the
prongs pointing down (Using oven mitt or heavy glove if the
grill is hot). Insert the notched end of the Grill Lifter into the
grill, in front of the midway point (front to back- Figure 14A)
and central (left to right-Fig 14B). Twist the grill lifter (clockwise
or counter-clockwise) so the handle is parallel to the grill rods.
This “seats” the spiked end of the Grill Lifter between two rods
enabling you to safely lift the grill out of the barbecue. Lift
slowly and adjust the Grill Lifter if necessary to balance.
WARMING RACK
Your Fire Magic warming rack is packed seperately with the
barbecue. It is assembled quickly and easily following the
instructions provided. When complete, just position it as
suggested to enjoy the benefits this useful accessory affords.
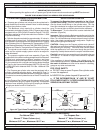
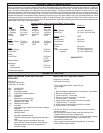
Installing and using Your Optional Rotisserie Kit
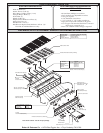
I
tem No.Part No. Description
1. 3600-05 Elite fan cooled motor
2. 3600-18 Spit bracket with offset
3. 3613 Elite spit prongs
4. 3600-13 Handle
5. 3607-40 Spit rod 5/8" hex x 51 1/2"
6. 3620 Counter Balance
2
3
4
5
1
6
1. Remove the cooking grids from your barbecue.
2. Place the rotisserie motor with the bracket into the slot on
the right side of your barbecue, making sure the knob and
cord are facing away from the barbecue (see above).
3. Place the spit bracket into the slot on the left side of your
barbecue with the offset out.
4. Place pointed end of the spit rod into the motor. The groove
in the handle end of the spit will rest on the spit bracket .
Note: The Counter Balance, which is included with your
Rotisserie Kit, should be used to balance the load on your
rotisserie and prolong the life of your motor. Heavy unbalanced
meats can stress rotisserie motor and may cause failure.
To use the Counterbalance supplied with your Barbecue:
1. Place meat on the spit in the normal manner. Center and
balance as carefully as possible.
2. Tighten the screws on the prongs, chicken holder or turkey
holder to secure the meat.
3. Hold spit rod at each end and lift. Do not grip the rod.
Let rod rotate so heavy side of meat hangs down naturally.
4. Turn the counterbalance on the spit so the counterbalance
rod and weight point upward or opposite from the heavy side
of the meat. Tighten the counterbalance rod in the hub
against a flat surface of the spit rod to secure.
5. Loosen the thumb screw and slide the weight along the
counterbalance rod to balance the meat. Since meats are
not a uniform shape, it may not be possible to achieve a
perfect balance. Properly balanced meat should not rotate
when you hold the spit rod loosely by the ends.
6. Make sure the counterbalance does not strike the barbecue
frame when the rotisserie is started.
MOTOR
BARBECUE
RIGHT SLOT
HANDLE
BARBECUE
LEFT SLOT
THUMB SCREW
SPIT BRACKET
SPIT ROD
SPIT PRONGS
BARBECUE
FRONT FACE
COUNTER
BALANCE
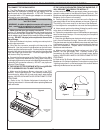
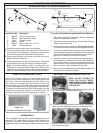
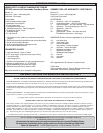
1. Remove the rubber cap by depressing and turning the cap
counterclockwise and lifting away the cap.
2. The battery is now accessible for removal and replacement.
Make sure that the battery spring is re-installed with the
new battery, and the battery is negative (-) end up.
3. Replace rubber cap by pressing in and turning it clockwise.
until it locks into place.
WRONG!
REPLACING THE SPARK GENERATOR BATTERY
NOTE: DO NOT ATTEMPT TO
TURN THE PLASTIC BEZEL
RING. DOING THIS MAY BREAK
THE BEZEL RING AND DAMAGE
THE IGNITOR.
Placement of the Grill Lifter in Grill
Figure 14A
Figure 14B