


Special offers from our partners!

Find Replacement BBQ Parts for 20,308 Models. Repair your BBQ today.

31
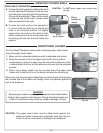
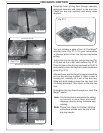
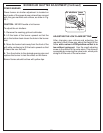
REGULATOR CONVERSION
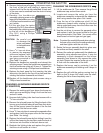
The gas regulator, located behind the control panel, must
be set for the type of gas used to fuel the grill. To check
the regulator setting, remove the cap in the center of the
regulator (Fig. 31-1). Holding the cap vertical (see Fig.
31-2), the letters at the bottom of the plastic stalk indicate
the gas type for which the regulator is currently confi gured.
If the bottom of the regulator stalk does not indicate the
gas connected to the grill, remove the stalk from the cap,
invert, and replace into center of cap. Replace cap on the
regulator, screwing down until snug.
GAS ORIFICE CONVERSION
This Fire Magic
®
grill comes from the factory confi gured
for one type of gas as marked on the label behind the
control panel. When the grill is converted, this label
must be replaced or updated to identify the new gas.
Each burner has a brass orifi ce, which can be replaced
and must match the gas being used. When converting
the grill to a different gas, each burner’s orifi ce must
be replaced with the corresponding orifi ce for the new
gas.
Natural-gas to propane-gas conversions using a
tank internal to a portable grill require installation of
a propane tank holder (not included) for safety and
compliance with the ANSI standards referenced on
the cover of this document. This tank holder must be
purchased separately from the manufacturer.
Consult Table 1 at the beginning of this document to
determine the proper orifi ce sizes for each burner.
It is critical to the operation of each burner that its orifi ce
be fully inserted into the center of its orifi ce opening.
WARNING
Hazardous overheating will occur if a natural-gas
orifi ce is used with propane gas.
CAUTION: Make sure the grill is at a safe
temperature and isolated from gas and
electrical supplies before beginning.
For your safety, exercise caution, and make sure you
have adequate hand protection, such as gloves, when
handling metal parts.
Required tools:
• Phillips-head screwdriver (#2 medium)
• Needle-nose pliers
•
3
/
8
" hex nut driver (deep socket)
•
5
/
16
" hex nut driver
CHANGING THE MAIN BURNER ORIFICES
1. Remove the cooking grid from above the burner you
are working on by lifting it fi rst from the front and set
it aside.
2. Remove the fl avor grid from above the burner you
are working on and set it aside.
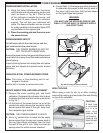
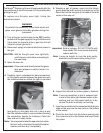
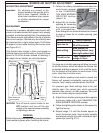
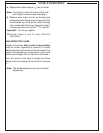
3. Remove the cotter pin from the left or right rear
burner anchoring peg by
pulling it straight out of the
cotter pin hole using fi ngers
or needle-nose pliers (Fig.
31-3).
CAUTION: The burner is
heavy.
4. Lift the back end of the burner
out of the anchor peg holes,
then move the burner toward
the back of the grill to clear
the gas inlet and set it aside.
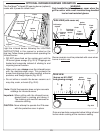
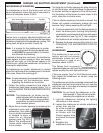
5. Use a
3
/
8
" hex nut driver to remove the exposed
orifi ce (Fig. 31-4) and replace it with the correct
orifi ce for the new gas. (See
Table 1 at the beginning of this
document for orifi ce sizes.)
6. Replace the burner by first
sliding the open cylindrical
end of the burner around
the orifi ce, enveloping it and
centering on it, then lower the
back end anchor pegs into the
anchor peg holes.
Note: It is critical to the continued safe functioning
of the burner that the orifi ce is centered and
completely inside the burner gas conduit.
7. Reinsert the cotter pin into the right rear burner
anchor peg using fi ngers or needle-nose pliers.
8. Replace the fl avor grid and then the cooking grid so
that the cutout section of the cooking grid is lined
up with the lighting tube.
Repeat these steps for each main burner.
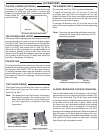
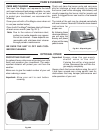
CHANGING THE BACKBURNER ORIFICE (IF
EQUIPPED)
1.
Remove the warming rack if installed and set it aside.
2. Remove the backburner cover.
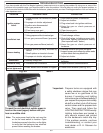
3. Unscrew all backburner access plate screws using
a Phillips-head screwdriver and set them aside.
Main
burner
Cotter pin
Fig. 31-3
Fig. 31-4
Orifi ce
CONVERTING THE GAS TYPE
Fig. 31-1
Fig. 31-2
Read gas
type here.
(LP shown)
Gas regulator
Note the cap on top.