


Special offers from our partners!

Find Replacement BBQ Parts for 20,308 Models. Repair your BBQ today.

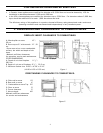
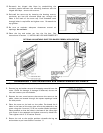
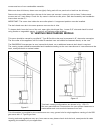
* As specified in CGA B149 Installation Codes (1991) Note: Local Codes or Regulations may require different clearances.
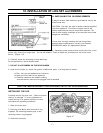
5. ASSEMBLY AND INSTALLATION INSTRUCTIONS
PREPARATION FOR INSTALLATION
• Remove the packaging from the appliance, pedestal or surround panels, check to make sure there is no damage.
Carefully check the glass door. Do not use the unit if it is damaged. In the event damage is found please report it
to both the courier and your dealer as soon as possible.
ASSEMBLING AND INSTALLING YOUR ENVIROGAS 828 FIREPLACE INSERT
1. Carefully clean the fireplace and flue before installing the
stove. Failure to do so may result in fumes or dirt being
blown into the room and may cause a fire leading to death
or serious injury.
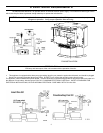
2. Remove the two wood screws that attach the stove to its
pallet. These are located through the square openings
immediately behind the surround panel mounting bracket
on each side of the unit. ( #2 Robertson screwdriver )
(See A in Figure 1)
3. Open hinged side flap, open door, remove log and ember
set and all wrapping material from the stove . Remove
wrapping material from log and embers and check for any
damage. If damage is observed do not use unit and contact
your local dealer.
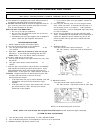
4. Remove the vent collar plate from the top of the stove
by unscrewing the T20 Torx screw, located on the center
top of the stove and slide backwards. (SEE FIGURE 4)
Properly secure the vent collar plate to the approved
flexible pipe liner previously installed in the chimney. Be
careful not to over stretch the liner.
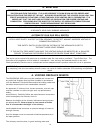
Figure 5
5. Place the unit part way into the fireplace. Connect the
fireplace insert's flexible gas line to the household gas
supply using locally approved methods.
6. For units with optional fan place the electric cable so it
can be connected to the power supply.
7. Push the unit into its final position in the fireplace
insuring that it is stable and level.
8. Reinstall the vent collar plate to the stove by sliding it
along the draft hood and secure with the screw.
9. Remove the hinged side flaps from the panel mounting
brackets on each side of the unit (fig 5).
10. Remove the top grill bar. Undo the 1/4" nuts holding
the stove top ( 7/16" wrench). Lift top up and remove.
11. For units with optional fan connect surround panel
wire harness to the stove wire harness following the wiring
diagram in fig 8.
12. Place the assembled surround panel around the stove,
in front of the surround mounting brackets. Make sure the
top surround panel sits flat on the stove.
6