


Special offers from our partners!

Find Replacement BBQ Parts for 20,308 Models. Repair your BBQ today.

4. ASSEMBLY AND INSTALLATION INSTRUCTIONS
ASSEMBLING AND INSTALLING YOUR ENVIROGAS ACCENT 25
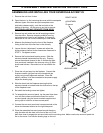
1. Remove the unit from it’s box
2. Open the door, by first removing the cover with the nameplate
attached (open valve door and pull nameplate cover
side tab to release catch), undo the two bolts at the
bottom of the door. Lift the door up and out to remove.
CAUTION GLASS MAY SEPARATE FROM DOOR.
3. Remove log and ember set and all wrapping material
from the stove. Remove wrapping material from log
and embers and check for any damage. If damage is
observed do not use unit and contact your local dealer.
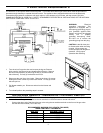
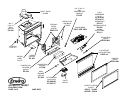
4. Measure the distance from the front of the fireplace
facing to the front of the flex liner in the chimney.
5. Loosen the two “adjustment” screws and adjust the
sliding exhaust channel to the dimensions measured in
STEP 1. Re-tighten screws.
6. Remove the front exhaust locating screw. Slide the
exhaust channel backwards from the unit. Properly
secure the exhaust channel to the 4“ flexible vent pipe
liner previously installed in the chimney using (3) three
sheet metal screws.. Be careful not to over stretch the
liner.
7. Place the unit part way into the fireplace. Connect the
fireplace insert's rigid gas line to the household gas
supply using locally approved methods. Place the
electric cable so it can be connected to the power supply.
Adjust the leveling legs
8. Slide the insert into the fireplace ensuring that the
exhaust channel is located under the slide rails on the top
of the fireplace insert.
9. Re-install the locating screw and tighten.
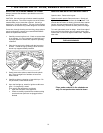
10. To assemble the surround panel, lay the panel face down
on a soft flat surface and place the brass trim on the
surround panel using the corner brackets supplied and
spring clips to hold trim to the surround panel.
11. Connect the surround panel wire harness terminal to the
stove wire harness terminal on the right side panel.
12. Place the assembled surround panel around the stove,
align the tabs with the slots in the front of the unit. Push
back then down to engage the surround slots on the mounting slots. Make sure the top surround panel sits
flat on the stove. If not use the leveling legs on the unit.
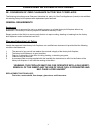
LEVELING LEGS
DRAFT HOOD
ADJUSTMEN
T
SCREWS
7