


Special offers from our partners!

Find Replacement BBQ Parts for 20,308 Models. Repair your BBQ today.

10.FUEL CONVERSION
“Warning” This conversion kit shall be installed by a qualified service technician in accordance with the
manufacturer’s instructions and all applicable codes and requirements of the authority having
jurisdiction. If the information in these instructions is not followed exactly, a fire, explosion or CO
poisoning may result. The qualified service agency is responsible for the proper installation of this kit.
The installation is not proper or complete until the operation of the converted appliance is checked as
specified in the owner’s conversion kit.
Please read and follow these instructions. Also please read the instruction guide lines provided by S.I.T on how to
remove and install the HI-LOW regulator.
STEP 1.
Carefully inspect all parts supplied with this conversion kit.
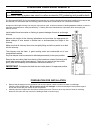
STEP 2. Shut the gas off and disconnect the main gas line from the unit.
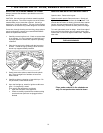
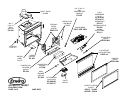
STEP 3. Open the door by undoing the two screws on the bottom of the door, pull door towards you then lift up
and out. Remove the logs and the burner tray from the unit, this will expose the main burner orifice and
the pilot assembly
STEP 4.
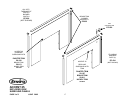
Change the regulator on the front of the gas valve. (Follow the instructions provided by S.I.T)
STEP 5.
To change the pilot orifice: First, pull the pilot head of the pilot assembly, using a 5/16” allen key
remove the pilot injector for assembly. Install the new pilot injector for the fuel being used.
(BE CAREFUL WHEN TIGHTENING THE PILOT FITTING, YOU COULD BREAK THE CERAMIC IGNITER
ELECTRODE).
STEP 6.
Re-install the pilot assembly in the reverse order of STEP 5.
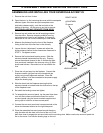
STEP 7. Remove the main burner orifice using a ½” deep socket
STEP 8. Install the new orifice supplied. Be sure to put a bead of pipe thread sealant or approved Teflon tape on
the orifice before installing the orifice into the burner assembly.
STEP 9.
Re-install the burner tray in unit, log set and door.
STEP 10. Reconnect the gas line to the unit. Do a leak check using a soap and water solution or an approved
manner on the gas supply line and the pilot tubing.
STEP 11.
Re-light the appliance to insure proper operation and proper flame appearance. Be sure to adjust the
venturi setting to achieve an efficient flame in the fireplace.
STEP 12.
MAKE SURE that the sticker provided by S.I.T is installed to signify that this valve has been converted
to a different type of fuel. Also make sure that the rating plate has a conversion label to show that this
unit has been converted to a different fuel type.
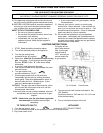
A VISUAL CHECK OF THE REGULATOR KNOB IS NECESSARY TO DETERMINE WHETHER OR NOT THE
REGULATOR IS THE CORRECT PART. A 50% TURN DOWN REGULATOR WILL HAVE ONLY ONE
CORNER ON THE KNOB.
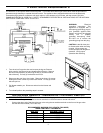
1 50% turn down HI-LOW Regulator w 3 T-20 Torx
screws
1 pilot injector
1 Main orifices
1 Pilot assembly mounting gasket
NATURAL GAS PROPANE.
CONVERSION KIT PARTS LIST
Pilot Orifice .62-mm .35-mm
Burner Orifice. # 42 DMS #53 DMS
Venturi Settings 1/16” open 3/8” open
13