


Special offers from our partners!

Find Replacement BBQ Parts for 20,308 Models. Repair your BBQ today.

www.desatech.com
110112-01C
14
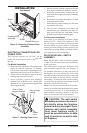
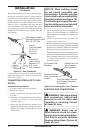
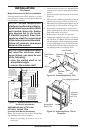
We recommend that you install a sediment trap in
supply line as shown in Figure 15. Locate sediment
trap where it is within reach for cleaning. Install in
piping system between fuel supply and fireplace.
Locate sediment trap where trapped matter is not
likely to freeze. A sediment trap traps moisture
and contaminants. This keeps them from going
into fireplace gas controls. If sediment trap is not
installed or is installed wrong, fireplace may not
run properly.
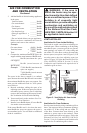
Figure 15 - Gas Connection
* Purchase the optional CSA design-certified
equipment shutoff valve from your dealer. See
Accessories, page 37.
CONNECTING FIREPLACE TO GAS
SUPPLY
Installation Items Needed
• 5/16" hex socket wrench or nut-driver
• Phillips screwdriver
• sealant (resistant to propane/LP gas, not
provided)
1. If fireplace screen and floor are still installed,
see Removing Fireplace Screen and Floor
Assembly, page 9.
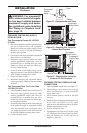
2. Route gas line (provided by installer) from
equipment shutoff valve to fireplace. Route
flexible gas supply line through one of the
access holes.
Natural
From Gas Meter
(5" W.C. to
10.5" W.C.
Pressure)
Propane/LP
From External
Regulator (11"
W.C. to 14 "
W.C. Pressure
CSA Design-Certified
Equipment Shutoff Valve
With 1/8" NPT Tap*
3" Minimum
Sediment Trap
Pipe Cap Tee
Nipple Joint
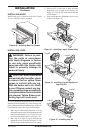
INSTALLATION
Continued
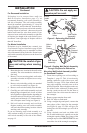
NOTICE: Most building codes
do not permit concealed gas
connections. A flexible gas line
is provided to allow accessibility
from the fireplace (see Figure 16).
The flexible gas supply line con-
nection to the equipment shutoff
valve should be accessible.
3. Attach the flexible gas line to gas supply (see
Figure 16). Check tightness of flexible gas
line attached to gas regulator of fireplace (see
Figure 16).
4. Check all gas connections for leaks. See
Checking Gas Connections.
5. Replace fireplace floor assembly. Feed flexible
gas line into fireplace base area while replacing
fireplace floor assembly. Make sure the entire
flexible gas line is in fireplace base area.
Note: Be careful of wires and components on
underside of fireplace floor. Reattach fireplace
floor assembly with screws removed in step
3 of Removing Fireplace Screen and Floor
Assembly, page 9.
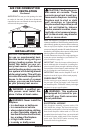
Figure 16 - Attaching Gas Lines Together
From Gas Meter (Natural)
From External Regulator
(Propane/LP)
Flexible Gas Line
from Fireplace
Gas Regulator
To Fireplace Gas
Regulator
Equipment Shutoff
Valve Provided by
Installer
CHECKING GAS CONNECTIONS
WARNING: Test all gas piping
and connections, internal and
external to unit, for leaks after
installing or servicing. Correct
all leaks at once.
WARNING: Never use an
open flame to check for a leak.
Apply a noncorrosive leak detec-
tion fluid to all joints. Bubbles
forming show a leak. Correct all
leaks at once.