


Special offers from our partners!

Find Replacement BBQ Parts for 20,308 Models. Repair your BBQ today.

9
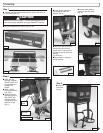
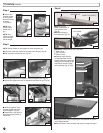
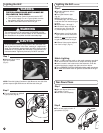
Step 7
■ Install two Grease
Pans from front as
shown. (Fig. 34)
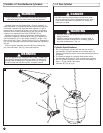
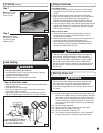
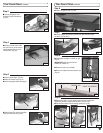
How to Check for Leaks
1. Make a soapy solution of equal parts mild liquid dishwashing
detergent and water.
2. Turn off all burner control knobs.
3. Turn on fuel supply. Turn cylinder valve knob counterclock-
wise (right to left) one rotation.
4. Apply soap solution to connections indicated with arrows in
Fig. 36. If bubbles appear at these areas, a leak is indicated.
DANGER
TO PREVENT FIRE OR EXPLOSION HAZARD:
• NO SMOKING. DO NOT use or permit sources of ignition
in the area while doing a leak test.
• Perform leak tests outdoors only.
• NEVER perform a leak test with fire or flame.
Step 8
■ Install 9-Volt Battery
with positive (+) terminal
as shown on Igniter
Module. (Fig. 35)
To Set Up continued
Leak Testing
+ -
Fig. 34
Fig. 36
Igniter Module
Fig. 35
❑ 1. Inspect the gas supply hoses before each use. Hoses can
be burned or chafed if they are routed improperly. See that
hoses have no kinks, sharp bends or tension. Insure that
hoses are at least 3 inches away from any hot surface. If it
is evident that there is excessive abrasion or wear, or the
hose is cut, it must be replaced prior to the grill being put
into operation.
❑ 2. Use only the gas specified.
❑ 3. Keep the grill on a level surface and lock the Castor.
❑ 4. Keep grease pans empty at start up.
❑ 5. Do not use charcoal or lighting fluid.
❑ 6. The minimum operating temperature is 40°F. Below 40°F
the grill performance is reduced by cold temperatures.
WARNING
Failure to follow these safety steps before using grill each
time could result in a fire that could be hazardous to you,
your appliance or property. It is especially important to
observe these steps after the grill has been stored, moved
or cleaned.
CAUTION
Inspect the gas supply hoses before each use. If there are
cuts, damage, excessive abrasion or wear, replace the
hoses prior to operating the appliance. During assembly of
grill and when attaching or replacing the L. P. gas cylinder,
insure that all gas supply hoses are free of kinks and/or
damage and are at least 3" away from hot surfaces such as
the grill housing. Use only hose replacements specified in
the parts list.
If you detect a leak:
1. Turn off the fuel supply. Push in and turn on control knobs
to release pressure in hose, then return the control knobs
to OFF.
2. Wash off soapy solutions with cold water and towel dry.
3. Stop a leak by tightening the loose joint, or by replacing the
faulty part with a replacement part recommended by
Coleman. DO NOT attempt to repair the cylinder valve if it
should become damaged; the cylinder MUST be replaced.
4. If you are unable to stop a leak, shut off the gas supply at the
cylinder valve. Remove the cylinder from the grill. Call a gas
appliance serviceman or L.P. gas dealer. DO NOT use grill
until the leak is corrected.
When to test for leaks:
1. Perform a leak test each time the gas supply cylinder is
connected to the regulator. Leak test anytime a part of
the gas system is replaced.
2. Perform a leak test at least once each year whether the L.P.
gas supply cylinder has been disconnected or not.
3. Have a dealer check the cylinder for deterioration after 12
years, according to DOT regulations. Immediately replace
cylinder if any deterioration is found
Fixing a Fuel Leak
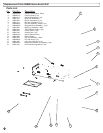
Start-Up Check List
REPRESENTATIVE
ILLUSTRATION