


Special offers from our partners!

Find Replacement BBQ Parts for 20,308 Models. Repair your BBQ today.

10
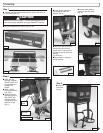
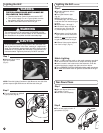
Step 1
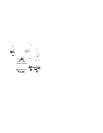
■ Make sure Burner Valves
are in OFF position.
(Fig. 37)
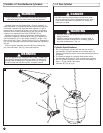
■ Turn on fuel supply on righthand
L.P. gas cylinder. (Fig. 38)
WARNING
THE FOLLOWING RULES MUST ALWAYS BE
FOLLOWED IN THIS ORDER :
1. Check that the Burner Control Knobs are turned to “OFF.”
2. Turn on fuel supply. For an L.P. gas cylinder, turn the
top cylinder valve knob counterclockwise to open.
3. DO NOT stand with head or arms over grill.
Step 2
WARNING
This procedure MUST be performed OUTDOORS only! Be
sure L.P. cylinder valve is closed. Attach to Grill. Read and fol-
low directions on the cylinder and fuel hose safety tags.
CAUTION
In the connection process, the grill side of the connection will
seal on the back-check in the valve, resulting in a slight resist-
ance. The connection requires about one-half to three-quarters
additional turn to complete the connection. To disconnect, turn
counterclockwise. Tighten by hand only. DO NOT use tools.
NOTE: Follow this Lighting Procedure to light Burners on one side of the
grill then repeat to light the Burners on the other side of the grill.
Lighting the Grill
Fig. 37
Fig. 38
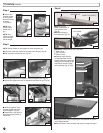
■ Turn right side burner valve to
“High.” (Fig. 39)
■ Press igniter button to light.
(Fig. 40)
NOTE:
If the flame doesn’t
immediately light, turn off control
knob and wait five minutes for gas
to clear.
■
Repeat steps 1 through 3.
■
If the burner does not light on
second try, turn off knob and
try match-lighting the burner.
■ Repeat steps 2 and 3 for left side
L.P. gas cylinder and left side burner.
NOTE: You m
ust push Igniter Button
to ignite the second side of the grill.
■ All Burner Valves can be adjusted
from “Low” to “High.” (Fig. 41)
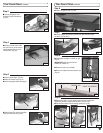
Step 3
■ Make sure Burner Valves are in
OFF position. (Fig. 42)
■ Allow unit to cool completely.
■ Turn off fuel supply on both L.P.
gas cylinders. (Fig. 43)
Step 1
Step 2
Lighting the Grill continued
Tear Down/Clean
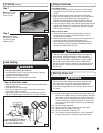
Match Lighting
■
Use a LONG wooden match or the match extension provided.
Make sure all burner controls are off except one being lighted.
■
Insert a match in the holder end of the extension, strike the
match and place the match near the burner from above.
■
Turn on BURNER CONTROL KNOB while holding match near burner.
■
You must use another match to ignite the second side of the grill.
Fig. 40
Fig. 41
Fig. 39
Fig. 42