


Special offers from our partners!

Find Replacement BBQ Parts for 20,308 Models. Repair your BBQ today.

English - 5
r This product is fueled by propane
gas. Propane gas is invisible,
odorless, and flammable. An odorant
is normally added to help detect
leaks and can be described as a
“rotten egg” smell. The odorant can
fade over time so leaking gas is not
always detectable by smell alone.
r Only cylinders marked “propane”
must be used.
r Use only propane gas set up for
vapor withdrawal.
r Propane gas should be stored
or used in compliance with local
ordinances and codes or with ANSI/
NFPA 58. Turn off propane and
disconnect cylinder when not in use.
r Cylinders must be stored out of
reach of children.
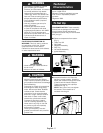
WARNING
CALIFORNIA PROPOSITION 65:
WARNING: This fuel, and by products
of combustion of this fuel, contain
chemicals known to the state of
California to cause cancer, birth defects,
or other reproductive harm.
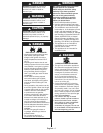
BURN HAZARD
r Never leave grill unattended when
hot or in use.
r Keep out of reach of children.
WARNING
SERVICE SAFETY
r Keep all connections and fittings
clean. Inspect propane cylinder and
grill propane connections for damage
before attaching.
r During set up, check all connections
and fittings for leaks using soapy
water. Never use a flame. Bubbles
indicate a leak. Check that the
connection is not cross-threaded
and that it is tight. Perform another
leak check. If there is still a leak,
remove the cylinder and contact
Coleman for service or repairs.
r Use as a cooking appliance only.
Never alter in any way or use with
any device or part not expressly
approved by Coleman.
r Clean grill frequently to avoid
grease accumulation and possible
grease fires.
CAUTION
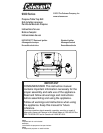
Technical
Characteristics
To Set Up
CONSUMER NOTICE: These assembly
instructions are designed for more than
one grill model. Some features and
components shown may not be included
with your grill.
Input: 10,000 BTU/h
Category: Pressure regulated propane
Fuel: 16.4 oz. disposable propane
cylinders
Regulator: 9930
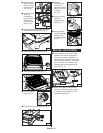
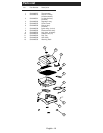
■ Remove components from carton.
(Fig. 1)
r Table Top Grill
r Grill Grate
r Regulator Assembly
r Drip Tray
r Lid Handle Assembly
r Igniter Assembly
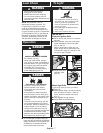
■ Assemble handle to lid. Place the
handle in proper location. Install the
screw and a washer through the inside
of the lid and the handle insulator.
Tighten the screws with a phillips
screwdriver. (Fig. 2)
NOTE: Take care to not over-tighten
the screws. The screwdriver is
included with the grill.
Fig. 1
Fig. 2