


Special offers from our partners!

Find Replacement BBQ Parts for 20,308 Models. Repair your BBQ today.

8
S5
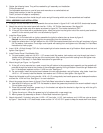
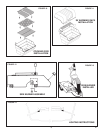
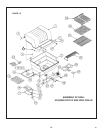
11. Install the burner as shown by figure 8 and figure 9.
A. Tilt the burner forward and guide its two venturi tubes through the rectangular hole in the bottom of the grill as shown
by figure 9. CAUTION: During installation of the burner, care should be taken to not damage the grill’s ignitor wire.
B. Push the ends of venturi tubes onto the corresponding factory-installed gas orifices located beneath the grill. See
figure 10.
C. Install ignitor wire, female end, by pushing it onto male ignitor, if equipped with piezo.
See Patio Base Instructions, step 8 for control housing installation.
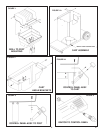
12. Place the Briquet Rack in the grill bottom. See figure 10.
13. Spread the Briquets in a single layer evenly over the Briquet Rack. Do not overlap or stack briquet. There may be some
briquets left over. Save them for future use. See figure 10.
14. Put cooking grids in place in the grill bottom. The cooking grids can be independently placed in different positions for
different cooking heights above the Briquets. See figure 10.
15. Install Warming Rack as shown by figures 11, depending on your grill model.
16. If your grill is equipped with a side burner, the side burner has been factory-assembled and its gas hose has been
factory-connected to the grill. Mount the side burner on whichever side of the grill you choose and install two knobs on
the side burner. See figure 12.
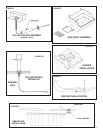
A. Determine which side of the grill the side burner is to be mounted on.
B. Install the side burner’s mounting bracket. The side burner mounting bracket installs exactly like a side shelf mounting
bracket. See figure 7.
C. Lower the side burner onto the mounting bracket so that the side burner’s rear clamp is clamped around the back tube
of the mounting bracket as shown by figure 12.
D. Attach the front clamp to side burner and the front tube of the mounting bracket with two No. 10-24 x 3/8" screws, two
3/16” ID shakeproof washers, and two No. 10-24 nuts as shown by figure 12.
E. Push gas knob onto valve stem protruding through the side burner’s front panel as shown by figure 12. The knob will
fit only one way on the stem. After knob is on the stem, turn the knob to the OFF position if not already there.
F. Attach lid knob to the side burner’s lid with one 1/4-20 x 1/2" screw and one 1/2" OD shakeproof washer as shown by
figure 12.
Figure 13 shows a side burner mounted on the left side of a grill.
The side burner can be used to simmer, saute, boil or fry.
NOTE: PROPANE-gas grills can only be equipped with PROPANE - gas side burners and NATURAL-gas grills can only
be equipped with NATURAL-gas side burners.
17. Connect gas supply to grill per A or B below.
A. For PROPANE-gas grills:
1. Place properly filled PROPANE-gas cylinder in position and secure with the retainer provided.
2. Screw the grill’s regulator fitting onto the PROPANE - gas cylinder’s valve outlet male thread clockwise and tighten
securely.
NOTE: Regulator’s female fitting has right hand threads. Check fittings on tank and regulator, they may be different or
could be left hand threads. Vent on regulator must point down while the regulator is connected to the PROPANE - gas
cylinder.
3. The gas supply must be turned OFF at the PROPANE - gas cylinder when the grill is not in use.
B. For NATURAL - gas grills:
1. Arrange with local gas company to have a gas supply line installed for the grill.
2. If the grill is mounted on an in-ground post or patio base post, arrange with the local gas company to have the gas
supply line connected to the grill.
3. If the grill is mounted on a cart, obtain Broilmaster’s NG12 twelve-foot flexible hose and quick-disconnect kit to
connect the grill to the gas supply line installed by the local gas company. Connect the flexible hose to the grill
and gas supply line per the instructions furnished with the NG12 kit.
4. Always turn gas OFF at the gas supply line shutoff valve when a grill is not in use.
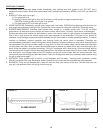
18. Check for gas leaks:
A. The appliance and its individual shutoff valve must be disconnected from the gas supply piping system during any
pressure testing of that system at test pressures in excess of 1/2 psi (3.5kPa).
B. The appliance must be isolated from the gas supply piping system by closing its individual manual shutoff valve during
any pressure testing of the gas supply piping system at test pressures equal to or less than 1/2 psi (3.5 kPa).
Check for gas leaks after connecting a PROPANE - gas cylinder to a grill, or when a cylinder has not been used for a
long time, or when a grill (PROPANE or NATURAL model) is being used for the first time or has not been used for
long time.