


Special offers from our partners!

Find Replacement BBQ Parts for 20,308 Models. Repair your BBQ today.

5
S5
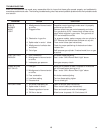
2. Gather the following items. They will be needed for grill assembly and installation.
Phillips Screwdriver
Two adjustable wrenches or a set of open end wrenches or a socket/ratchet set
Soapy water solution (to test for gas leaks)
Pencil (to check off steps as completed)
3. Remove all loose parts from inside the grill carton and grill housing which are to be assembled and installed.
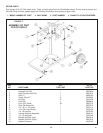
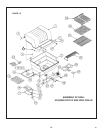
GRILL
ASSEMBLY AND INSTALLATION
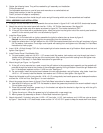
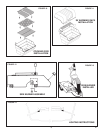
1. If the grill is to be mounted on a cart, assemble the cart as shown in figure 1A & 2 with #10-3/8" sheet metal screws.
2. Attach the valve to the control panel with two No. 10-24 x 1/2" Phillips head screws. See figure 2A.
A. Push the gas knobs onto valve stems as shown by figure 2A. Turn knobs clockwise to OFF.
B. If the grill is furnished with a pushbutton ignitor, insert the ignitor into the ignitor hole of the control panel and then
secure it to the control panel with a nut as shown by figure 4.
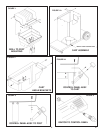
3. Install the Piezo Ignitor
A. If your grill is furnished with an ignitor, assemble the ignitor’s collector box as shown by figure 5.
Caution: do not cut or damage the ignitor wire protruding from the collector box.
B. Install the collector box in the grill bottom thru the 15/32 hole located toward the front of the grill as shown in figure
5A. Flat washer, lock washer, 2 nuts align control panel with casting front and tighten nuts. See step 5 in Patio Base
Instructions to hook up gas.
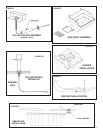
4. Insert 10-24 x 3/4 bolt through 7/32" dia. hole located right of center towards rear of grill bottom. Attach speed nut and
tighten. See figure 6.
5. Install Control Panel. Post Models Only.
A. For post models, route two 1/4-20 x 1-1/2" screws install flat washer, lock washer and nuts through two holes in
bottom of the grill bottom and the top of the control panel. Align control panel with casting front and tighten nuts.
See figure 3. See step 5 in Patio Base instructions for gas hook up.
6. Mount the grill per Figure 1 or Figure 2A.
A. If the grill is to be mounted on a post, mount the grill bottom to the prepared post assembly so the eyebolts will
protrude through the holes at the corners of the rectangular opening in the grill bottom. Secure the grill bottom with
four 1/4 shakeproof washers and four 1/4-20 hex nuts. See figure 1.
B. For cart models, install the control panel between the cart angle brackets, and grill bottom. align holes. Insert four
1/4-20 x 1-1/2" screws, install flat washer, lock washer and 1/4-20 nut, then tighten. See figure 2A.
7. Attach the lid handle to grill lid using two No. 10-24 x 3 1/2" carriage bolts, two handle spacers, two shakeproof washers
and two No. 10-24 hex nuts. See figure 1 for cart installation.
8. Mount the grease tray as shown in figure 6. See Patio Base instructions for base installation.
A. Use the #10-24 wing nut and 5/8" O.D. flat washer to attach the grease tray bracket to the screw installed in step 4.
Do not tighten wing nut yet.
B. Place the provided aluminum grease tray in the bracket and adjust the bracket to align the tray with the grill’s
grease drain hole in grill bottom.
C. Tighten the wing nut. When the grease tray is full replace with a new empty tray.
D. Mount grease cup assembly as shown in Patio Base Instructions (figure 6)
9. Attach side shelf, if included, using two 1/4-20 x 1/2" hex bolts, 1/4 I.D. lock washers, and 1/4-20 hex nuts as shown
by figure 7. Use the #8 x 1/2” sheet metal screw and the 1/4" x 5/16" O.D. spacer to keep the wood shelf from sliding.