


Special offers from our partners!

Find Replacement BBQ Parts for 20,308 Models. Repair your BBQ today.

10
S5
Use soapy water to check for leaks.
DANGER: DO NOT USE CANDLES, MATCHES OR OTHER IGNITION SOURCES WHEN CHECKING FOR GAS
LEAKS. FUEL GASES ARE VERY FLAMMABLE AND, IN CERTAIN CONCENTRATIONS, EXPLOSIVE. CHECKING
FOR LEAKS WITH AN OPEN FLAME MAY LEAD TO FIRE OR EXPLOSION.
To check for gas leaks:
1. Use water and dish washing soap to make a soapy water solution.
2. Turn gas knobs located on grill’s control panel to OFF. Turn gas knob located on side burner’s control panel to
OFF.
3. For PROPANE - gas grills, turn gas ON at PROPANE - gas cylinder. For NATURAL - gas grills, turn gas ON at gas
supply line shutoff valve. (A hissing sound indicates a leak: Turn OFF gas supply, repair leak, turn ON gas supply
and proceed.)
4. Apply the soapy water solution to all gas connections.
5. Look for bubbles. Bubbles indicate gas leaks.
6. If bubbles are detected, turn gas OFF and tighten or repair leaking gas connections.
7. Turn gas ON and recheck for leaks. All gas connections must be leak-free.
8. For PROPANE - gas grills, turn gas OFF at PROPANE - gas cylinder until ready for use. For NATURAL - gas grills,
turn gas OFF at gas supply line shutoff valve until ready for use.
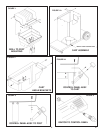
OPERATING INSTRUCTIONS
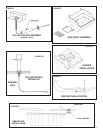
Before lighting a grill’s burner, make sure its venturi tubes are properly positioned on the gas orifices as described earlier
and as shown by figure 9. Check for gas leaks as described earlier.
Burners may be lit by ignitor or wooden match as described below. Light one burner at a time and light only the burners
needed.
Avoid moving a portable grill when the gas is turned on and a burner is lit.
IGNIT
OR
LIGHTING PROCEDURE
Turn all gas knobs on the grill and side burner clockwise to OFF, then turn gas on at source and light the desired
burners as described below.
To light the grill’s double burner:
1. Raise the grill lid.
2. Push in and turn either the left gas knob or the right gas knob counterclockwise to HI.
3. If the grill’s ignitor is a pushbutton type, push the ignitor three or four times until the chosen section of the double burner
ignites; ignition should occur within about five seconds.
4. After the first section of the double burner is lit, ignite the other section by pushing in and turning its gas knob
counterclockwise to HI; ignition should occur automatically within about five seconds.
NOTE: Both sections of the double burner may be lit simultaneously by pushing in and turning both gas knobs to HI and
then operating the ignitor three or four times as described by step 3 above; ignition should occur within about five seconds.
If your grill was not furnished with an ignitor and you decide you want one for your grill, you may order an ignitor kit from
your Broilmaster dealer: Just read the lighting instructions on your grill’s control panel label to determine which type of
ignitor kit to order, then ask your Broilmaster dealer for pushbutton ignitor kit B056596.
To light the side burner:
1. Raise the side burner lid.
2. Push in and turn the side burner’s gas knob counterclockwise to HI.
3. Push the side burner’s ignitor three or four times until the side burner ignites; ignition should occur within about five
seconds.
NOTE: If a burner fails to ignite within five seconds, turn that burner’s gas knob clockwise to OFF, wait five minutes for the
gas to clear, then reattempt the ignitor lighting procedure or light with a wooden match as described by the following
MATCH LIGHTING PROCEDURE.
MA
TCH LIGHTING PROCEDURE
Turn all gas knobs on the grill and side burner clockwise to OFF, then turn gas on at source and light the desired
burners as described below.
To light the grill’s double burner:
1. Raise the grill lid.
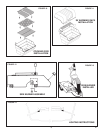
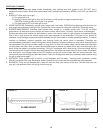
2. Light a long wooden match and insert it through lighter hole in either side of the grill (which lighter hole depends on which
section of the burner is being lit). See figure 14.
3. Push in and turn the corresponding gas knob on the grill’s control panel counterclockwise to HI. That section of the burner
should ignite within about five seconds.
4. Light the other section of the burner by pushing in and turning the outer gas knob on the grill’s control panel
counterclockwise to HI. That section of the burner should ignite automatically within about five seconds.