


Special offers from our partners!

Find Replacement BBQ Parts for 20,308 Models. Repair your BBQ today.

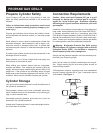
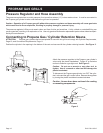
B101748-1-0512 Page 19
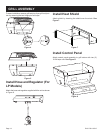
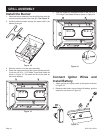
GRILL ASSEMBLY
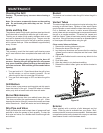
Assemble Drain Pan
Note: Drain pipe and valve coponents are packed inside
the smoker box.
1. Lightly spread pipe sealant on all threads before assem-
bling to the drain pan.
2. Thread the 3/4” pipe into the bottom of the drain pan and
tighten.
3. Assemble the two 45° elbows as shown in Figure 23.
Note: Make sure of the mountings (posts, carts, etc.)
being used before tightening to ensure that the ttings
are set to the proper position.
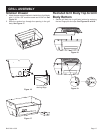
DRAIN PAN
3/4” PIPE
45° ELBOWS
FOR USE ON ALL POSTS
AND DCB AND PCB CARTS
FOR USE ON PSCB CART
DRAIN PAN
3/4” PIPE
45° ELBOWS
PIPE SEALANT OR
TEFLONTAPE
PIPE SEALANT OR
TEFLONTAPE
Figure 23
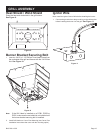
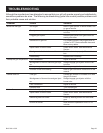
Install the Drain Pan Assembly
1. Lower the drain pan into the lower casting with the drain
pipe on the right side. Pass the pipe through the oval
hole in the bottom of the casting, making sure the pipe
extends out through the bottom of the casting and the
pan is sitting level on the holding tabs. See Figure 24.
2. Slide the drain bucket hanger into place over the pipe
and screw on the drain shut off valve and tighten.
Note: Position Drain Shut Off Valve so it does not interfere
with the wall of the grill head.
DRAIN BUCKET HANGER
DRAIN SHUT OFF VALVE
Figure 24
3. Set cooking grids in place.
Note: The grids are designed for two levels of cooking.
4. Hang the drip bucket on the drain bucket hanger.
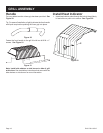
NOTE: If the grill was installed on a cart, make sure to install
the cart’s heat shield before use.