


Special offers from our partners!

Find Replacement BBQ Parts for 20,308 Models. Repair your BBQ today.

2
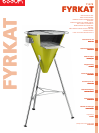
fyrkat
a very WarM WelcoMe oUtSide!
What do we associate more with spring and summer than eating outside? And what is more perfect than
the pleasure of a really first-class barbecue? Whatever you like best – a hearty steak, a crispy sausage or
grilled veggies – with the BODUM
®
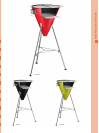
Cone Grill «FYRKAT» you have made the right choice for a sociable
summer. A barbecue is probably the only culinary event at which the proverb «Too many cooks spoil the
broth» does not apply: When barbecuing, many cooks are at work. If you are not too easily seduced by
rich sauces, barbequed food is not only extremely tasty but also healthy and light, especially if you use
lean meat, fish and vegetables.
Bon appetit!
All we would like to do now is to ask you to read these instructions carefully as they contain important
safety and hazard warnings as well as useful barbecuing tips, and – of course – to wish you a wonderful
summer.
With best wishes from the BODUM
®
Design Team
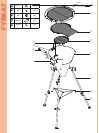
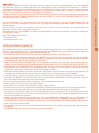
ASSEMBLY INSTRUCTIONS:
BarBecUe aSSeMBly
1. Grill grate-large
2. Grill grate-small
3. Charcoal grate
4. Grilling bowl
5. Support legs with bracket (3x)
6. Stabilizer
7. Support legs with foot (3x)
8. Retaining plate with grill utensil hooks
9. Handle
10. Handle retainer
11. Grill grate retainer (2x)
12. M6 screws (6x)
13. Washers Ø 6 mm (12x)
14. M6 nuts (9x)
15. M6 screws (3x)
16. M4 screws (2x)
17. Handle grill grate
ASSEMBLY INSTRUCTIONS
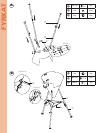
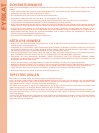
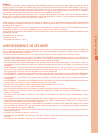
figUre a
Warning! Do not tighten the bolts and nuts too firmly in the following assembly step.
Place the grilling bowl (4) carefully upside down on a level surface and attach each of the three support legs with
brackets (5) to the grilling bowl (4). In order to secure the support legs (5) to the grilling bowl use two M6 screws (12),
four washers Ø 6 mm (13) and two M6 nuts (14) per leg. (See Fig. A / Detail V). Subsequently guide a support leg with
foot (7) into each support leg with bracket (5), as shown in Fig. A.
figUre B
Stand the grill on its support legs (7). Secure the support legs (5 / 7) using a stabilizer (6). You need one M6 screw (16)
and one M6 nut (14) per support leg as shown in Fig. B / Detail X. Now sufficiently tighten all of the screws and nuts
on the grill.
Now mount the handle (9) on the preassembled handle retainer (10) on the grilling bowl (4). Slide the handle (9) into
the handle retainer (10) and secure it with two M4 screws (16), as shown in Fig. B / Detail W.