


Special offers from our partners!

Find Replacement BBQ Parts for 20,308 Models. Repair your BBQ today.

3
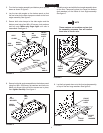
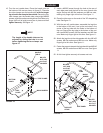
3. Turn the front angle assembly and bottom panel upside
downasshowningure3.
4. Lay the two side angles on the bottom panel so that
the two holes for the axle clamps are closer to the front
angleassembly.Seegure3.
5. Secure both axle clamps to the side angles and the
bottom panel using four M6 x 30 screws, lock washers
and hex nuts. Make only nger tight until axle is
assembled.Seegure3.
FIGURE 4
FIGURE 6
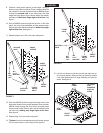
8. Lay the front panel down onto the front angle assembly,
ontopofthefourlargewashers.Seegure6.
FIGURE 3
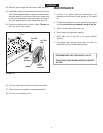
7. Stand the cart on end with the front angle assembly down
ontheoor.Temporarilyplacefourlargeatwashers
(axle washers) on the inside of front angle assembly.
Seegure5.
These washers act as shims and are just
for assembly purposes. You will remove
them later to use on axle.
NOTE
6. Secure both side angle assemblies to the bottom panel
usingfourM6x25screws,atwashersandhexnuts.
Makeonlyngertightuntilallfourscrewsareinplace,
then tighten securely.Seegure4.
FIGURE 5
ENGLISH
M6X30
SCREW
BOTTOM
PANEL
SIDE
ANGLE
SIDE
ANGLE
FRONT
ANGLE
ASS'Y
M6
HEX
NUT
AXLE
CLAMP
Ф6
LOCK
WASHER
M6
HEX
NUT
M6X25
SCREW
Ф6
FLAT
WASHER
LARGE
FLAT
WASHER
FRONT
PANEL
BOTTOM
PANEL
FRONT
ANGLE
ASS'Y
LARGE
FLAT
WASHER
FRONT
ANGLE
ASS'Y
FRONT
PANEL