


Special offers from our partners!

Find Replacement BBQ Parts for 20,308 Models. Repair your BBQ today.

2
RULES FOR SAFE OPERATION
FIGURE 1
ASSEMBLY INSTRUCTIONS
TOOLS REQUIRED
(1) Screw Driver
(1) Pliers
(1) 10 mm Wrench
When assembling your cart, place the heads of all
screws to the inside and hex nuts with at washers to
the outside.
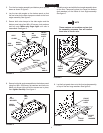
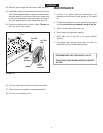
The bottom panel has one galvanized edge;
this is the rear. The front edge has three
holes. See gure 2.
NOTE
1. Laythefrontangleassemblydown(at)onoorand
standthebottompanelinpositionasshowningure
2.
FIGURE 2
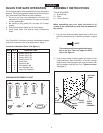
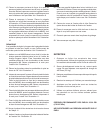
HARDWARE REFERENCE CHART
Your Farm/Yard Cart carton contains a hardware package
with parts as shown in the chart below and in gure 1.
REF. QTY. DESCRIPTION
A 6 Screws, M6 X 50
B 2 Screws, M6 X 40
C 8 Screws, M6 X 30
D 21 Screws, M6 X 25
E 4 Cotter Pins
F 37 Hex Nuts, M6
G 33 Flat Washer, Φ6
H 4 Lock Washers, Φ6
I 4 Large Flat Washers
Contents of Hardware Pack: (See gure 1)
Preventing accidents is the responsibility of every equipment
operator. The following general safety precautions must be
fully understood and followed by every operator.
1. Do not at any time carry passengers in this cart. It is
designed for carrying materials only and not intended
to carry passengers.
2. Be careful on any grade (hill) and stay off of steep
grades.
3. Use caution when loading cart to avoid tipping.
4. Avoid large holes and ditches when transporting
loads.
2. Line up three holes in bottom panel with holes in front
angle assembly. Start three M6 x 25 screws through
bottom panel, then through angle. Secure screws with
Ф6 at washers and M6 hex nuts. Tighten securely.
See gure 2.
ENGLISH
FRONT
ANGLE
ASSEMBLY
THREE
HOLES
M6X25
SCREW
Ф6
FLAT
WASHER
BOTTOM
PANEL
M6
HEX
NUT
I
H
G
F
M6X50
M6X30
E
D
C
A
M6X25
B
M6X40