


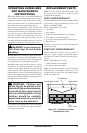

Special offers from our partners!

Find Replacement BBQ Parts for 20,308 Models. Repair your BBQ today.

www.desatech.com
105116-01D 13
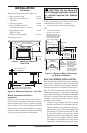
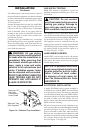
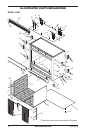
Figure 15 - Locating Electrical
Connection and Gas Connection on
Either Side of Fireplace
Cover
Plates
Electrical
Connection
Access Hole
Gas Connection
Access Hole
Note: A 120V supply connection to the leads to
the receptacle must be provided for use with the
optional blower kit whether installed during or
after initial rebox installation. You may not be
able to install a supply connection after the nal
installation is completed. Refer to Optional Blower
Assembly Installation for specics.
INSTALLATION
Continued
OPTIONAL BLOWER ASSEMBLY
INSTALLATION
Proper installation of the blower system is required
to insure that the maximum discharge of air can
be delivered through the louvers on each side of
the replace.
Note: You may perform this installation from
either side of the replace within either room. The
lower door panels are removable from both sides
of the rebox for better access.
1. Remove the blower assembly from the pack-
aging and inspect the fan and wiring for dam-
age. If any wiring is loose or damaged, return
the assembly for exchange to your dealer or
distributor.
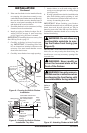
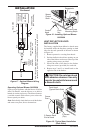
2. Remove the 2 screws located at the top of the
lower door panel. Slide door panel forward
and up to remove tabs on panel from locating
slots in rebox (see Figure 16).
3. Locate the two strips of hook and loop mounting
strips on one side of the base of the lower com-
partment. Align the mounting strips on blower
with mounting strips on base of rebox.
4. Install blower housing with exhaust outlet
ports directed upwards along inner side wall of
lower compartment. The blower outlets must
be installed ush to the outer cabinet for air
to ow properly.
5. Apply gentle force between hook and loop
mounting strips to seat blower.
6. Remove control knob and lock nut from
blower speed control shaft.
7. Place speed control shaft through 3/8" hole
provided in right side of lower door panel
removed in step 2.
8. While supporting speed control housing, se-
cure shaft in panel hole with lock nut. Place
control knob on shaft.
9. Plug blower power cord into receptacle lo-
cated in lower rebox compartment. Check
to make sure there are no foreign objects in
blower wheel.
WARNING: Never touch the
blower wheel while in operation.
10. Turn blower on and check for proper operation.
11. Turn blower off before continuing.
12. Replace lower door panel by inserting tabs on
bottom of panel into locating slots on rebox.
Push door panel into an upright position and
secure with screws removed in step 2.
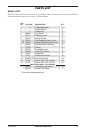
Figure 16 - Removing Lower Door Panel
Locating
Holes
Door Panel
Locating Slot
Locating
Slot