


Special offers from our partners!

Find Replacement BBQ Parts for 20,308 Models. Repair your BBQ today.

11
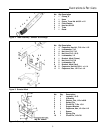
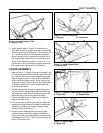
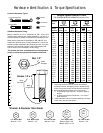
Discharge Tube Installation
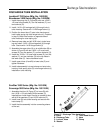
DISCHARGE TUBE INSTALLATION
Landlord/1700 Series (Mfg. No. 1692526)
Broadmoor/1600 Series (Mfg. No. 1692526)
1. Install the spring clip (D, Figure 26) with two 10/32 x
1/2 truss head screws (E), four flat washers (F), and
two locknuts (G).
2. Install 1/4-20 x 5/8 carriage bolt (H) through hole in
turbo housing. Secure with 1/4-20 flange locknut (I).
3. Position the lower tube (C) onto turbo housing and
hook inside spring clip onto flange locknut (I, installed
in step 2). Mark hole location on opposite side of
turbo housing for outer spring clip.
4. Remove lower tube and drill 9/32 hole in turbo hous-
ing and install 1/4-20 x 5/8 carriage bolt (H) through
hole. Secure with 1/4-20 flange locknut (I)
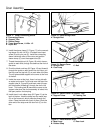
5. Assemble the upper tube (A) on to middle tube (B) as
shown in Figure 2 with two 10/32 x 1/2 truss head
screws (E), four flat washer (F), and two locknuts (G).
6. Install two 10/32 x 1/2 truss head screws (E), four flat
washer (F), and two locknuts (G) to the top holes in
the lower tube (C). Leave hardware loose.
7. Install upper tubes (A and B) to lower tube (C) and
tighten hardware.
8. Install tube assembly into cart sleeve and onto turbo
housing. Hook spring clips (D) onto flange locknuts (I)
installed on turbo housing.
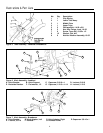
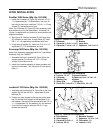
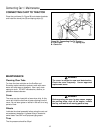
SunStar/1900 Series (Mfg. No. 1691526)
Sovereign/900 Series (Mfg. No. 16911526)
1. Assemble the tube (A, Figure 27) to hose (B) with
four 10/32 x 1/2 truss head Phillips screws (C)
installed from inside hose. Secure on outside of tube
with #10 flat washers (D) and 10/32 locknuts (E).
2. Install hose (B) onto turbo housing and secure with
hose clamp (F).
3. Install the tube assembly into the connecting sleeve
of the cart.
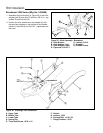
Figure 27. Discharge Tube Installation
A. Decal E. Truss Head Screw
B. Discharge Tube F. Hose
C. Locknut, Hose G. Clamp
D. Washer
E
G
D
C
B
A
F