


Special offers from our partners!

Find Replacement BBQ Parts for 20,308 Models. Repair your BBQ today.

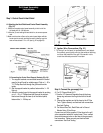
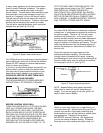
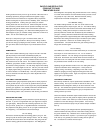
In many areas, spiders or small insects have been
found to create "flashback" problems. The spiders
spin webs and/or insects build nests in the grill's
venturi tube(s). The web and/or nests can lead to gas
flow obstruction, which can damage your grill as it
results in a "flashback" (a fire in the venturi tube(s).
The grill may still light, but the obstruction does not
allow full gas flow to the burner. Therefore, some gas
will back up and escape at the venturi air shutter.
This will ignite, causing flashback, which could also
damage your grill (see Fig. 35 & 36).
19
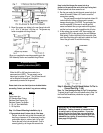
SPIDER WEBS
INSIDE VENTURI
2
Figure 35 Spider webs inside venturi
Your PGS grill has fine mesh brass screening placed
around the burner venturis to minimize this problem.
Please DO NOT damage or remove these screens
when you clean your burners.
If you live in an area where spiders are plentiful, you
should make it a point to clean the venturis often.
You may want to spray around the bottom of your
base with an insect repellent on a regular basis.
PLEASE BE CERTAIN TO KEEP THEM AWAY
FROM ANIMALS AND CHILDREN.
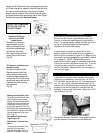
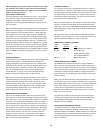
TO CLEAN BURNERS OF SPIDER WEBS SEE
INSTRUCTION #1 OF PERIODIC CLEANING.
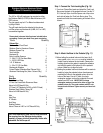
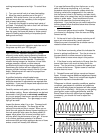
SPIDER WEBS CLEAN OUT
Figure 36 Venturi cleaning out
BEFORE LIGHTING YOUR GRILL:
TURN YOUR GAS SUPPLY (LP OR NAT) ON AND
TEST ALL FITTINGS FOR LEAKS. BEFORE
ATTEMPTING TO LIGHT GRILL, BE CERTAIN
BOTH VALVES ARE IN THE OFF POSITION. BE
CERTAIN THAT YOUR GAS SUPPLY IS OFF AND
YOUR GAS FEED LINE HAS BEEN BLED OF ANY
FUEL. WHEN REINSTALLING BURNER, BE
CERTAIN THAT THE BURNER VENTURIS ARE
ENGAGED ON THE VALVES AT LEAST 1/4". TO
TEST FOR GAS LEAKS TURN GAS SUPPLY ON
(leaving both control knobs in the "OFF" position)
AND CHECK ALL CONNECTIONS WITH A
SOLUTION OF 50% LIQUID SOAP, 50% WATER.
SOLUTION CAN BE SPRAYED ON WITH A SPRAY
BOTTLE OR PAINTED ON ALL CONNECTIONS
WITH A BRUSH. IF BUBBLES APPEAR, TURN OFF
GAS, TIGHTEN FITTINGS AND TRY AGAIN.
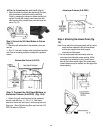
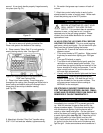
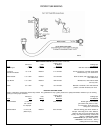
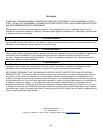
ELECTRODE ADJUSTMENT
On model A30 & A40 there is an electrode, inside the
collector box, it is adjusted and checked at the factory
for optimum spark. The tip is 1/8" from the inside
surface of the collector box. In the event that the
ceramic insulator should crack and need replacement,
the collector box is easily removed by removing the
large nut holding it to the bottom grill casting. The grill
head must be removed from the pedestal support to
replace the collector box (electrode and collector box
are one unit).
Check the new part for proper spacing of the
electrode end before installing. Since the feed-
through fixture is threaded its full length, loosening
and tightening two jam nuts will move the electrode tip
closer or farther away from the collector box surface.
For best spark, set at 1/8" (see Fig. 37).
ELECTODE
COLLECTOR
BOX
CERAMIC INSULATOR
JAM NUTS
0
Figure 37 Proper electrode adjustment
NOTE: Replace battery when sparks noticeably
slows down or every six months (depending on
usage). If you are not going to use your grill for 30
days or more, remove battery.
FLARE-UPS
When you cook fatty foods over an open flame, you
can expect flare-ups. Natural juices falling on the hot
ceramic rock results in flame and smoke that give
foods cooked on your grill that delicious outdoor flavor
and appearance. Expect and encourage a
MODERATE amount of flare-up. We suggest that
you trim off excess fat before cooking. Excessive
flare-ups occur when cooking extra fatty foods, or if