


Special offers from our partners!

Find Replacement BBQ Parts for 20,308 Models. Repair your BBQ today.
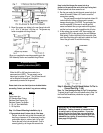
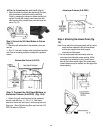
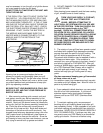
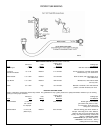
may be necessary to turn the grill or to light the burner
via a vent opening under the grill head.
DO NOT TOSS A LIT MATCH INTO THE
18
UNIT AND
THE GRILL STILL FAILS TO LIGHT, CHECK THE
E
TURN THE GAS ON!
IF
GAS SUPPLY. YOU COULD BE OUT OF LP GAS
OR THE MAIN GAS SUPPLY FOR NATURAL GAS
MAY HAVE BEEN TURNED OFF. IF THE LP TANK
HAS GAS OR THE NATURAL GAS IS TURNED ON
AND THE GRILL STILL WILL NOT LIGHT: CHECK
THE ELECTRONIC IGNITOR TO MAKE SURE IT IS
SPARKING. IF NOT, CHECK THE BATTERY IN
THE MODULE AND ALSO MAKE SURE THE
IGNITOR WIRE IS CONNECTED BOTH TO TH
MODULE AND TO THE BOTTOM OF THE
ELECTRODE.
HOLE
TURN ON LIGHT
H
Figure 34 Manual Lighting of Grill
RIGHT KNOB LONG MATC
PERIODIC CLEANING
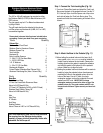
nowing how to remove and replace the burner
ill.
t
E SURE THAT YOUR BARBECUE IS COLD, GAS
. After removing cooking grids, ceramic rock and
tor
d
. DO NOT DAMAGE THE CERAMIC PROBE OR
assembly and the lower casting
TURN YOUR GAS SUPPLY (LP OR NAT)
LIGHT G
R.
NS
K
allows you to easily and thoroughly clean your gr
Even though "Burning Off" the grill after every cookou
will keep it ready for instant use, once or twice a year
you should perform basic maintenance to keep your
grill in top operating condition.
B
SUPPLY IS OFF AND THAT YOUR FEEDLINE IS
BLED OF ANY GAS.
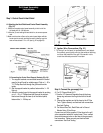
1
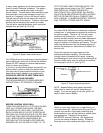
rock grates, remove your burner assembly by first
carefully disconnecting the lead wire from your igni
module. Gently pull the burner forward to release the
spring clip, then pull the burner assembly forward and
up. Cover the valve orifices with a small piece of
aluminum foil to keep out dirt. Brush both sides an
the bottom of the burner with a stiff wire brush. Any
clogged flame holes may be opened using a thin wire
Use a venturi brush (or bottlebrush), pipe cleaner or
long flexible wire to clean out the venturis. Since the
grill housing is heavy rust-free cast aluminum, you are
only trying to remove built up grease and debris.
.
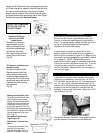
5
2
COLLECTOR BOX.
After cleaning burner
of grill, reinstall burner to lower casting.
ON AND TEST ALL FITTINGS FOR
LEAKS. BEFORE ATTEMPTING TO
RILL, BE CERTAIN BOTH VALVES ARE
IN THE OFF POSITION. TURN GAS SUPPLY ON
(leaving both control knobs in the "OFF"
position). CHECK ALL CONNECTIONS WITH A
SOLUTION OF 50% LIQUID SOAP, 50% WATE
SOLUTION CAN BE SPRAYED ON WITH A SPRAY
BOTTLE OR PAINTED ON ALL CONNECTIO
WITH A BRUSH. IF BUBBLES APPEAR, TURN
OFF GAS, TIGHTEN FITTINGS AND TRY AGAIN.
BE SURE ORIFICES ARE ENGAGED INTO THE
BURNER VENTURIS.
3.
The exterior of your grill has been powder coated
and baked with a special high temperature powder
process that seals the paint to the grill housing. The
grill will retain its appearance with a little care.
Occasional white oxidation may be washed off with a
mild soap and warm water. Once oxidation is
removed, turn your grill burners to low heat, close lid
and allow to heat up for FIVE MINUTES. After grill
housing is WARM apply a small amount of vegetable
oil or PGS Stainless Steel Cleaner with a clean lint
free cloth and apply evenly to grill housing. This
method will keep your grill looking new for many
years.
We also recommend keeping your grill covered at
all times, when not in use.
For stubborn cases, high temperature touch up paint
can make an old grill appear new. Allow 24 hours for
paint to dry before using grill.
4. If your pedestal is black aluminum you can protect
this with a car finish protectorate. If you have a
stainless support use a good grade of stainless
cleaner such as our PGS "SSC" (Stainless Steel
Cleaner).
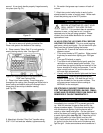
. To maintain cooking grids, we recommend
brushing with a grill cleaning brass brush after grill
has completely cooled. A light vegetable oil on grids
just before cooking will prevent food from sticking to
the surface. NEVER PLACE COOKING GRIDS IN A
SELF-CLEANING OVEN. If grids are very dirty, you
may want to see your PGS Dealer for a commercial
quality grid cleaner. Be sure to oil before using.
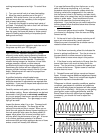
FLASHBACK