


Special offers from our partners!

Find Replacement BBQ Parts for 20,308 Models. Repair your BBQ today.

3
SOAPY WATER TEST WARNINGS & PROCEDURES
REGULATOR, BURNER AND GAS VALVE CONNECTION & OPERATION
MATCH LIGHT INSTRUCTIONS
WARNINGS
• Soapy Water Test MUST be performed each time gas cylinder is connected to burner/hose or each time it
is used.
• Soapy Water Test MUST be performed outdoors in well ventilated area.
• When performing Soapy Water Test keep smoker away from open fl ames, sparks or lit cigarettes.
• Smoker is designed to work with propane gas only. Only use gas cylinders marked propane with this unit.
This product will NOT operate with natural gas.
• Never use an open fl ame to test for gas leaks.
PREPARATION:
• Remove any cookware from smoker.
• Make sure regulator and gas cylinder valve to OFF position.
• Prepare soapy water solution: (1) part dish washing liquid (or more if desired), (3) parts water.
• Apply soapy water solution to gas cylinder valve, regulator and hose length up to burner.
TESTING GAS VALVE:
• Turn gas cylinder valve ON and watch for bubbles. DO NOT LEAVE GAS ON MORE THAN
12 SECONDS. If bubbles appear, stop, turn gas cylinder OFF and retighten fi tting. Repeat test.
TESTING REGULATOR AND HOSE:
• AFTER gas cylinder valve has passed Soapy Water Test, turn gas cylinder valve ON, open regulator
control valve one full turn and check for bubbles at valve location, along full length of hose and at burner
connection. DO NOT LEAVE GAS ON MORE THAN 12 SECONDS. If bubbles appear, stop, turn
regulator valve OFF, turn gas cylinder OFF and retighten the connection that is leaking gas. If hose is
source of leak, STOP, do not use unit. Hose must be replaced.
• When test is complete, and there are no leaks, wait minimum of 5 minutes for gas fumes to diminish
before lighting cooker.
DURING ANY PORTION OF SOAPY WATER TEST IF BUBBLES CONTINUE TO
APPEAR, STOP, DO NOT USE UNIT. CONTACT LOCAL PROPANE DEALER OR
MASTERBUILT CUSTOMER SERVICE @ 1-800-489-1581.
Note: Use 20LB (9kgs) gas cylinder that has a protective collar with this unit.
Cylinder NOT included with this unit.
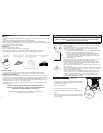
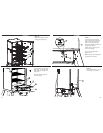
Apply solution to
gas cylinder valve
Apply solution to hose regulator
and the full length of the hose
Apply solution underneath control
panel where burner and hose are
connected
Failed test will present bubbles as
shown below.
(Smoker shown on back for clarity only)
WARNING
PERFORM “SOAPY WATER TEST” BEFORE EACH USE. SEE “SOAPY WATER TEST” SECTION IN
MANUAL. EXTINGUISH ALL OPEN FLAMES BEFORE CONNECTING REGULATOR TO GAS
CYLINDER. TURN GAS OFF AFTER EACH USE.
• Inspect hose before each use. If there are signs of wear, cuts, or leaks, replace
unit. DO NOT USE.
• Inspect burner before each use. Check burner and burner ventura tube for
insects and insect nests. A clogged tube can lead to a fi re beneath appliance.
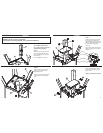
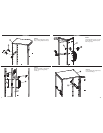
• Connect hose regulator to LP Gas Cylinder
1. Make sure gas cylinder valve is closed. Turn knob clockwise until it stops.
2. Make sure control knob on smoker is in the “OFF” position.
3. Remove protective cap from gas cylinder and coupling nut if applicable.
4. Center and insert regulator nipple into valve outlet on gas cylinder as
shown in fi gure on the left. Turn regulator coupling nut clockwise until it
stops. DO NOT OVER TIGHTEN.
• Perform Soapy Water Test.
• To use turn gas cylinder ON, turn regulator control valve ON, push burner control
knob in and turn counter-clockwise ¼ turn. Push ignitor button to light.
• If ignition does not take place within fi ve seconds, turn gas control valve to off
position and wait fi ve minutes and repeat lighting procedures. If ignition still does
not occur, see match light directions below.
• After use turn burner control knob OFF, turn regulator control valve OFF, then turn
gas cylinder OFF.
• Burner control knob adjusts burner fl ame. Turn knob counter-clockwise to decrease
fl ame. Turn knob clockwise SLOWLY to increase fl ame. Push burner control knob
in and turn clockwise to shut fl ame off.
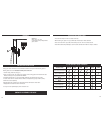
• Visually check burner fl ame. A CORRECT FLAME should be blue with a small
amount of yellow at the tip. An INCORRECT FLAME is excessively yellow and
irregular. If an incorrect fl ame occurs, turn burner control knob to “OFF position,
turn off regulator and propane tank. Allow unit to cool and then clean burner.
Let burner completely dry before re-lighting.
CLOCKWISE
COUNTER
CLOCKWISE
17.75”
(45cm)
APPROX.
12.25” (45cm)
APPROX.
YELLOW
BLUE
1. Read all instructions and warnings before lighting.
2. Check gas control valve and gas cylinder valve to be certain it is in
OFF position before connecting to gas cylinder. Perform soapy
water test before each use.
3. Open door during lighting.
4. Turn gas control valve on, turn gas cylinder valve on.
5. Place a long, lit fi replace match stick close enough to burner to
ignite.
6. After each use, fi rst turn gas control valve off, then gas cylinder
valve off. Always allow unit to cool completely before touching,
moving or storing.
4