


Special offers from our partners!

Find Replacement BBQ Parts for 20,308 Models. Repair your BBQ today.

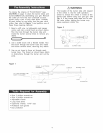
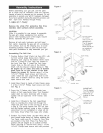
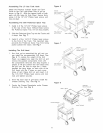
Assernb{ingThe LP Gas Tank Hook
Attachthe PressureCylinderHolderandTank
Guideto the CartLegs-WheelSideof grillas
shownin Fig.6. Alignthe tappedholesof both
partswith the holeson SidePanel.Securefirmly
using4 of the 1/4"xl/2"Phillipsheadscrewsand
nutsprovided.
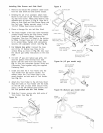
AssemblingTheGrilmPulled-outSpiceTray
1. install2 of the 1/4"xl/2"Phillipsheadscrews
to the rearof the Track.Withoutthesescrews
the Pulled-outSpiceTraywill notstopproperly.
2. SlidethePulled-outSpiceTrayintotheTracksuntil
it stops.See Fig. 7.
Install2 of the 1/'4"xl/2"Phillipshead screws
to the frontof the Track.This importantstep
preventsthe Pulled-outSpiceTrayfrom being
pulledoutsidethe tracks.See Fig.7.
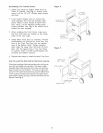
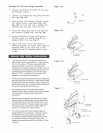
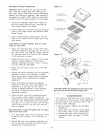
Installing The GrimmHead
Nowthat you'veassembledthe grill cart you
can installthe pre-assembledGrillHead.See
Fig. 8. To reducethe weightof the Grill
Head,we suggestyou openthe Grill Lid and
removethe packedcomponents.Evenwith
the componentsremoved,this steprequires2
peopleto lift and positionthe Grill Headonto
the grill cart. Be sure to alignthe 2 holes
beneaththe hangledgeon eachside of the
Grill Headwith the 2 holeson each cross
braceof cart. RaiseGrill Lid and insert4 of
the 1/4"xl-3/8"Phillipsheadscrewsand lock
nutsand tightensecurely.
2. Fromthe backside of grill head,installthe
GreaseDrainingTray. See Fig. 8.
3. Centerthe GreaseReceptacleunderGrease
DrainingTray.See Fig. 8.
Figure6
TRACK
FOR PULLED-OUT
SPICE TRA_
PULLED-OUT
SPICE TRAY SIDE PANEL
Figure 7
PULLED-OUT
SPICE TRAY
Figure 8
GRILL HEAD
PRESSURE
CYLINDER
HOLDER
TANK GUIDE
PULLED-OUT
SPICE TRAY
GREASE
RECEPTACLE
\
CROSS BRACE
\
HANG LEDGE
GREASE
DRAINING
TRAY
11