


Special offers from our partners!

Find Replacement BBQ Parts for 20,308 Models. Repair your BBQ today.

Aswithallappliances,propercareandmaintenance
willkeepyourgrillintopoperatingconditionand
prolongitslife.Byfollowingthesecleaningprocedures
onatimelybasis,yourgrillwillstaycleanandwork
properiywithminimumeffort.
ImportantNote:Useaspongeorwashclothtoclean
exteriorgrillsurfaces.Afiberorbrasscleaningbrush
canbeusedtocleaninteriorgrillpartswhichwill
accumulatefoodandgrease;GrillBowl,Cooking
Grids,FlameTamers,GreaseDrainingTrayand
GreaseReceptacle.Neveruseawirebrushormetal
scraperwhichcanscratchorchiptheporcelainfinish
ofyourgrillandpromoterustingwhichisnotcovered
byyourproductwarranty.
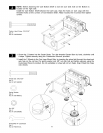
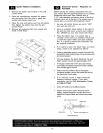
Cleaning the Grill Interior
Burning-off the grill after every cookout will keep it
ready for instant use. However, once a year you should
give the entire grill a thorough cleaning to keep it in top
operating condition. Follow these steps:
1. Turn all Burner Valves to the full OFF position.
2. Turn the LP gas tank valve to the full OFF position.
.
Disconnect the regulator from the gas tank. Inspect
the hose with regulator assembly for cracking, cuts
or any other damage, and replace as neccessary
with Sears replacement parts. See Parts List.
4. Remove and clean the Flame Tamers, Cooking
Grids, Cooking Rack and Grill Burners.
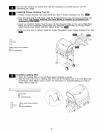
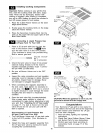
Cleaning the Cooking Grids
Before initial use and as needed, wash Cooking Grids
with a mild detergent and rinse with hot water. For
stubborn food residue use a degreaser and fiber or
brass cleaning brush. Dry immediately using a soft
cloth or paper towels.
CAUTION: Never clean your grill unless you are
sure it is cool to the touch.
Cleaning the Flame Tamers
To reduce the chance offlare-ups, Flame Tamers
should be cleaned whenever food or grease drippings
accumulate. Wash Flame Tamers with a mild deter-
gent and rinse with hot water. Dry the Flame Tamers
thoroughly before you reinstall them into the grill bowl.
To remove stubborn food residue use adegreaser and
fiber or brass cleaning brush.
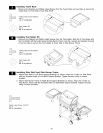
Cleaning the Grease Draining Tray, Heat Shield
and Grease Receptacle
To reduce the chance of fire, the Grease Draining Tray,
Heat Shield and Grease Receptacle should be in-
spected before each grill use. Remove grease
(a plastic spatula works welt) and wash all parts with a
mild soap and warm water solution.
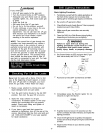
Cleaning Exterior Surfaces
Before initial use, and periodically thereafter, we
suggest you wash your grill using a mild soap and
warm water solution. You can use a wash cloth or
sponge for this process. Do not use a stiff wire or
brass brush that might remove paint during the clean-
ing process.
Keep outdoor cooking gas appliance area clear and
free from combustible materials, gasoline and other
flammable vapors and liquids.
Cleaning the Inside of the Grill Lid
Grease can have a tendency to build up on the inside
of the Grill Lid and could drip onto deck or patio when
the lid is opened. Visually inspect the inside of the
Grill Lid before each grill use. Remove any grease and
wash with a mild soap and warm water solution.
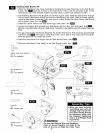
5. Cover each Gas Valve Orifice with aluminum foil.
6.
Brush the inside and bottom of the grill with a fiber
or brass cleaning brush, and wash with a mild
soap and warm water solution. Rinse thoroughly
and let dry.
7. Remove aluminum foil from Orifices and check
each Orifice for obstruction.
8. Check each Spark Electrode, adjusting as needed.
The space between the Spark Electrode Tip and
Spark Receiver should be approximately 3/16".
9. Replace the Burners and adjust the Gas Collector
Box. The edge of the collector box should be
overlapping the Burner Port.
10. Replace Flame Tamers and the Cooking Grids.
11. Reconnect the gas source and observe the Burner
flame for correct operation.
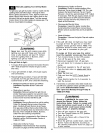
CAUTION:
1. Do not obstructthe flow of air for combustion
and ventilation.
2. Keep the ventilation openings of the cylinder
enclosure cabinet free and clear of debris.
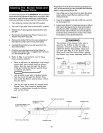
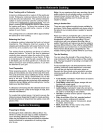
3. Visually check burner flames occasionally to
observe for proper flame pattern as shown below.
BURNER FLAME
MAGNIFIED VIEW _ _'N
THROUGH "1_
LIGHTING HOLE _
J
19