


Special offers from our partners!

Find Replacement BBQ Parts for 20,308 Models. Repair your BBQ today.

Main Burner Lighting Instructions
Lighting The Main Burner Burners With
Push And Turn Ignition
1. Before each use, check all hoses for cracks,
nicks, cuts, or abrasions. If a hose is
damaged in any way, do not use your grill
before replacing the hose with an authorized
part from the Parts List. Also make sure all
gas supply connections are securely
tightened.
2. Familiarize yourself with the Safety and Use
and Care instructions in this manual. Do not
smoke while lighting the grill or checking gas
supply connections.
3. Be sure the LP gas tank has gas.
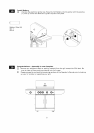
4. Open the grill lid.
5. Check that the end of each burner tube is
properly located over each valve orifice.
Failure to replace a faulty hose, secure gas
supply connections, or to open the lid
before proceeding to the Lighting
Procedures could result in a fire or
explosion that could cause serious bodily
injury, death, or property damage.
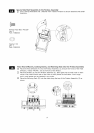
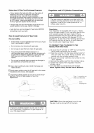
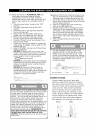
6,
Set control knobs to OFF and open the LP
gas tank valve SLOWLY.
I
OFF
HI/LIGHT
7,
LOW
Push in the burner control knob of the main
burner you wish to light and turn left to
"HI/LIGHT". You will hear a click as a spark is
sent to the burner. If the burner does not
light, then turn back to "OFF", and repeat
this procedure. Continue this process until
the burner lights.
I
OFF
HI/LIGHT _
LOW
25
Main Burner
8. When lit, turn the burner control knob to
its desired heat setting.
Side Burner and Back Burner
Lighting Instructions
Lighting The Side Burner Or Back
Burner With Electronic Ignition
Follow steps 1 through 5 of the Main Burner
Lighting Instructions.
1. Open the lid or side burner cover.
2. Set control knobs to OFF and open the LP
gas tank valve SLOWLY.
3. Push and turn the side burner or back
burner control knob to "HI/LIGHT".
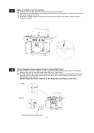
4,
Immediately press the electric igniter
button for 3-5 seconds to light the burner.
You should hear a clicking sound which
shows the electronic ignition is working.
If the burner does not light within 5
seconds, turn the burner control knob to
"Off". Wait 5 minutes for the gas to clear,
and repeat the above procedure.
6,
For the back burner, continue to push and
hold the burner control knob in for 5 to 7
seconds after the burner lights until the
flame sensor begins operating. Letting up
on the burner control knob before a high
enough temperature has been reached
may cause the flame sensor to shut off
fuel to the back burner.
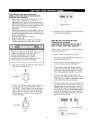
OT1
Back Burner Electric Igniter
L O --j--Side Burner