


Special offers from our partners!

Find Replacement BBQ Parts for 20,308 Models. Repair your BBQ today.

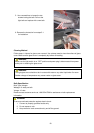
NOTE
It is normal for the skewer to flex when larger cuts
of meat are being cooked.
If the meat scrapes on the cooking grids during any
part of the rotation, the cooking grids must be
removed. Test this clearance before lighting the grill
as the cooking grids become hot when the grill is lit.
14
Adjust the counterbalance weight to balance the
heavier side of the meat and avoid lopsided rotation
of the rotisserie motor.
CAUTION
When using the rotisserie burner, remove the
warming rack. High heat from the burner may cause
the warming rack to bend.
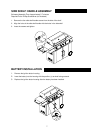
BEFORE LIGHTING…
Inspect the gas supply hose prior to turning on the
gas. If there is evidence of cuts, wear, or abrasion,
it must be replaced prior to use. Refer to “Leak
Testing” on page 11.
WARNING
Do not use the grill if the odor of gas is present.
Contact customer service at 1-800-554-5799.
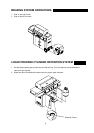
Screw the regulator (type QCC1) into the cylinder,
and leak check the hose and regulator connections
before operating the grill (See the “Leak Testing”
instructions on page 11).
Only the pressure regulator and hose assembly
supplied with the unit should be used. Never
substitute regulators. If a replacement is necessary,
contact customer service for proper replacement.
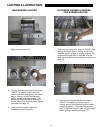
TO LIGHT THE GRILL BURNER
1. Make sure all the knobs are in the “OFF”
position, and then turn on the gas supply from
the liquid propane cylinder.
2. The electronic ignition is built into the valve. To
ignite the main burners, simply press and turn
each control knob to the “HI” setting. The
ignition system will “click” as the electrode
generates a spark. This spark will ignite the
burner.
3. If the burner does not light, turn off the gas
supply, wait 5 minutes for any excess gas to
dissipate and then try again.
4. If the burners still do not light, follow the match
lighting instructions on page 16.
FLAME CHARACTERISTICS
Check for proper burner flame characteristics. Each
burner is adjusted prior to shipment. However,
variations in the local gas supply may make minor
adjustments necessary.
Burner flames should be blue and stable with no
yellow tips, excessive noise or lifting.
Yellow flames indicate insufficient air. Noisy flames
or flames that lift away from the burner indicate too
much air (See the “GAS FLOW CHECK” section on
page 11).
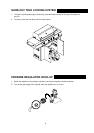
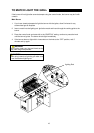
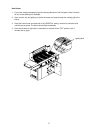
TO LIGHT THE ROTISSERIE BURNER:
1. Open the lid, and press the knob for about 5
seconds without turning it. This will allow time
for gas to flow into the rear burner.
2. The electronic ignition is built into the valve. To
ignite the rotisserie burner, simply press and
turn the control knob to the “HI” setting. The
ignition system will “click” as the electrode
generates a spark. This spark will ignite the
rotisserie burner.
3. If the burner does not light, turn the control
knob to the “OFF” position.
4. If the igniter does not function, follow the
instructions on page 18 for match lighting.
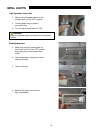
TO LIGHT THE SEARING SIDE BURNER:
1. Open the lid, and press searing side burner
knob for about 15 seconds without turning it.
This will allow time for gas to flow into the side
burner.
2. To ignite the searing side burner, simply press
and turn the knob to the “HI” setting. There will
be a “clicking” sound if the ignition system is
working correctly.
3. If the burner does not light, turn the control
knob to the “OFF” position.
4. If the igniter does not function, follow the
instructions on page 17 for match lighting.
Keep a spray bottle of soapy water near the
gas supply valve and check the connections
before each use.
LIGHTING INSTRUCTIONS