Special offers from our partners!

Find Replacement BBQ Parts for 20,308 Models. Repair your BBQ today.

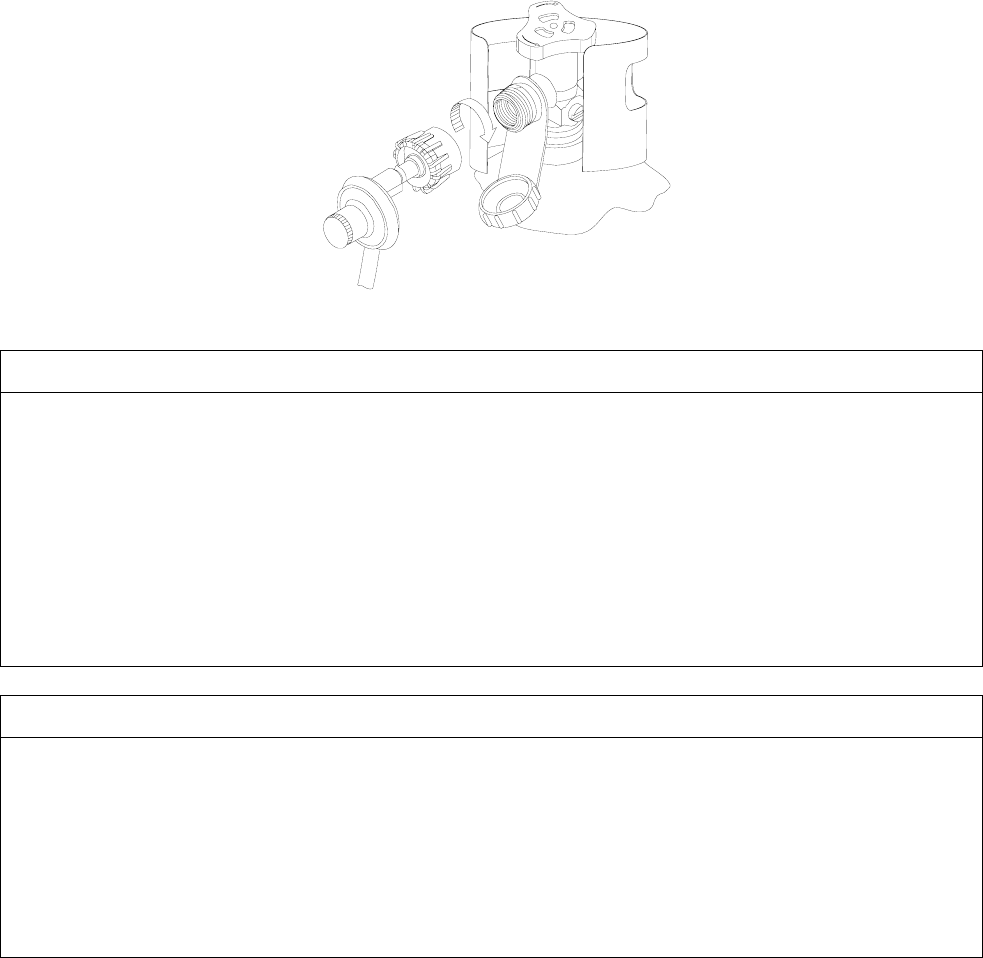
6. When connect regulator assembly to the valve, hand tighten nut clockwise to a positive stop. Do not
use a wrench to tighten. Use of a wrench may damage quick coupling nut and result in a hazardous
condition. (as the figure shown below)
7.
Open tank valve fully (counterclockwise). Use a soapy water solution to check all connections for
leaks before attempting to light grill. If a leak is found, turn tank valve off and do not use grill until a
local L.P. gas dealer can make repairs.
OPD HAND WHEEL
O
P
E
N
g
C
L
O
S
E
!!!WARNING!!!
1. Never insert any foreign objects into the valve outlet. It may damage the valve
and cause leak, leaking gas may result in fire, explosion, heavy body injury, or
even death.
2. Do not connect this grill to the self-contained L.P. gas system of a motor home or
camper trailer.
3. Do not use the grill until leak tested.
4. Stop and call the fire department if any leak detected.
5. If you cannot stop a gas leak, close the L.P. tank valve IMMEDIATELY, call L.P.
supplier or the fire department.
!!!DANGER!!!
1. NEVER store a spare L.P. tank under or near grill or in an enclosed area.
2. NEVER fill the tank beyond 80% full. An overfilled spare L.P. tank is dangerous
because surplus gas may leak from safety relief valve. The safety relief valve on a
L.P. tank could activate to release gas and cause a fire.
3. The spare L.P. tank must have safety caps installed on the L.P. tank outlet.
4. If any gas leak found on the spare L.P. tank, immediately go away from it and call
the fire department.
VERY IMPORTANT: DISCONNECTED THE TANK WHEN THIS GRILL IS NOT IN USE.
To disconnect L.P. gas tank:
1. Turn all the knobs off.
2. Turn the tank valve off fully (turn clockwise to stop).
3. Detach the regulator assembly from tank valve by turning the quick coupling nut counterclockwise.
4. Install the protective cap back L.P. tank valve.
8


