


Special offers from our partners!

Find Replacement BBQ Parts for 20,308 Models. Repair your BBQ today.

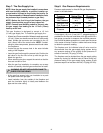
17
!
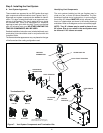
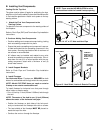
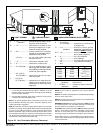
C. Vent Termination
For Horizontal Terminations - To attach and secure the
termination to the last section of horizontal vent refer to the
Cinch Pipe and Termination Cap installation instructions.
• Push and snap-lock the ends as described at the begin-
ning of the Installing Vent Components section.
• The termination kit should pass through the wall firestops
from the exterior of the building.
• Adjust the termination cap to its final exterior position on
the building.
WARNING: THE TERMINATION CAP MUST BE PO-
SITIONED SO THAT THE ARROW IS POINTING UP.
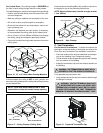
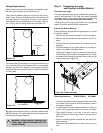
For trapezoidal cap termination kits:
• Using screws secure the cap to the exterior wall through
the flanges in the cap.
Figure 19. Trapezoid Termination Cap
!
WARNING: VENTING TERMINALS SHALL NOT
BE RECESSED INTO A WALL OR SIDING. VENT
TERMINATION CLEARANCES MUST BE FOLLOWED
TO AVOID FIRE DANGER. SEE VENT TERMINATION
MINIMUM CLEARANCES DIAGRAM ON NEXT PAGE.
7 1/4”
(184mm)
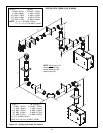
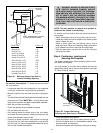
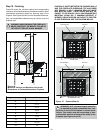
If the area above the ceiling IS an attic, position and secure
the firestop on top of the previously framed hole.
NOTE: Keep insulation away from the vent pipe at least
1 inch (25mm).
Figure 18. Attic Firestop
CEILING
CEILING FIRESTOP
RAFTER
NAILS (4 REQUIRED)
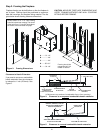
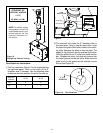
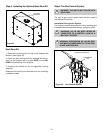
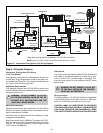
For Vertical Runs - One ceiling firestop is REQUIRED at
the hole in each ceiling through which the vent passes.
To install firestops for vertical runs that pass through ceilings:
• Position a plumb bob directly over the center of the verti-
cal vent component.
• Mark the ceiling to establish the centerpoint of the vent.
• Drill a hole or drive a nail through this centerpoint.
• Check the floor above for any obstructions, such as wir-
ing or plumbing runs.
• Reposition the fireplace and vent system, if necessary,
to accommodate the ceiling joists and/or obstructions.
• Cut an 10-inch X 10-inch (254mm X 254mm) hole through
the ceiling, using the centerpoint previously marked.
• Frame the hole with framing lumber the same size as the
ceiling joists.
Figure 17. Ceiling Firestop (Ceiling Side)
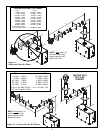
If the area above the ceiling is NOT an attic, position and
secure the ceiling firestop on the ceiling side of the previously
cut and framed hole.
Figure 16. 10" x 10" Hole & New Framing Members
JOIST
CEILING FIRESTOP
CEILING
NAILS (4 REQUIRED)
CEILING
NEW
FRAMING
MEMBERS
EXISTING CEILING
JOISTS
CHIMNEY
HOLE
10" (254mm)
10" (254mm)
NOTE: There must be NO INSULATION or other
combustibles inside the framed firestop opening.