


Special offers from our partners!

Find Replacement BBQ Parts for 20,308 Models. Repair your BBQ today.

Installation (for qualified installers only) 7
© Travis Industries 4080214 100-01182_003
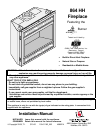
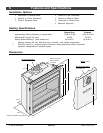
Packing List
• Propane Conversion Kit
• Log Set (9 piece)
• Grate
• Wall Switch with Wire (see page 20 for details)
• Firestop (sku 93006094
Additional Items Required
• FIREBACKS ARE REQUIRED – See page 47. (sku 98500662, 98500663, 98500664, or 98500665)
• Direct Vent
• Gas Line Equipment (shutoff valve, pipe, etc.)
• Electrical Equipment (min. 14 gauge, grounded line)
• Grill or Face
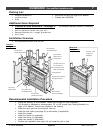
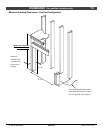
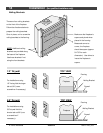
Installation Overview
• All requirements below must be met.
See the section
"Approved Vent
Configurations"
See the section
"Electrical Connection"
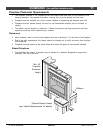
See the section
"Mantel Requirements"
Insulation must not fill
the 1/2" clearance
around the back and
sides of the fireplace.
See the section
"Vent Requirements"
See the section "Minimum
Framing Dimensions"
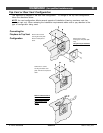
Drywall
T
op Vent
C
onfiguration
Rear Vent
Configuration
See the section
"Gas Line Installation"
1" Min.
Side
Wall
See "Facing
Requirements"
Drywall
See "Optional Non-
Combustible Hearth"
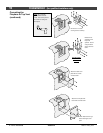
Nailing Brackets
Required Travis
Firestop (sku
93006094)
Recommended Installation Procedure
• Frame the opening for the fireplace. Make sure to allow for vent installation.
• This fireplace is designed to accommodate 1/2" or 5/8" drywall (see "Nailing Brackets" on
page 14 for details). Secure the fireplace to the framing.
• Install the vent, gas line and electrical hook-up.
• Install the wall switch (see page 20) or thermostat (if applicable).
• Install the drywall.
• Install the hearth (if applicable).
• Install the facing (if applicable).
• Install the mantel (if applicable).
• Finalize the installation (see page 43) and install the grill or face.