


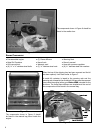


Special offers from our partners!

Find Replacement BBQ Parts for 20,308 Models. Repair your BBQ today.
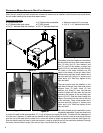
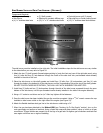
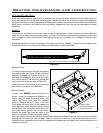
NATURAL GAS:
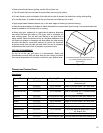
To Connect Gas Line:
1. Push back the sleeve on the socket as shown below.
2. Insert the plug and release the sleeve.
3. Push the plug until the sleeve snaps in forward to lock the
plug in place.
To Disconnect Gas Line:
1. Push the sleeve back and pull the plug out of the socket.
A qualied service agency or installer should perform all gas supply plumbing. In the U.S.A., the supply connection
must be made in accordance with local codes or in the absence of local codes, with the National Fuel Gas Codes,
ANSI Z233.1. In Canada, the gas supply connection should be carried out in accordance with the authority having
jurisdiction and in accordance with the requirements of the CAN/CGA 1-B149.1 and 2 installation code. A manual
shut off valve must be installed between the Gas Grill and the fuel supply system.
The outdoor cooking appliance must be disconnected from the fuel supply system before any pressure testing of
the system exceeds psi (3.5 kPa)
Check the rating label located on the back of this appliance to conrm that the burner valves and orices are
congured to burn Natural Gas. If required, install a Natural Gas conversion kit available through your ENVIRO
dealer.
14
Hooking Up To Gas Supply
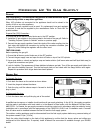
PROPANE:
FOR YOUR SAFETY: Do not store or use gasoline or other ammable vapors
in the vicinity of this or any other appliance.
Other LPG cylinders not connected to the appliance should not be stored in the
vicinity of this or any other appliance.
A hose and pressure regulator must be used. If a replacement hose and regulator
is required, it must be one supplied by the manufacturer. Refer to “Parts List” for
product number.
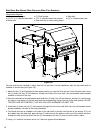
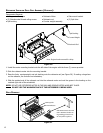
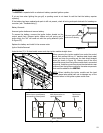
Propane Gas (LPG) Connection:
1. Ensure that all the burner control knobs are in the OFF position.
2. Install the LP gas cylinder in the hole provided in the base of the gas grill. Refer to
“Installing Propane Cylinder In Cabinet” section on previous page.
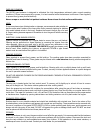
3. Connect the gas supply regulator. Insert the nipple of the valve coupling into the
tank valve and tighten the connection by turning the connection clockwise (see
Figure 24) while holding the regulator with the other hand.
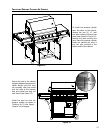
TEST FOR LEAKS:
Before operating the gas grill:
1. Ensure that all burner control knobs are in the OFF position.
2. Connect the gas supply hose and open the shut off valve on top of the LPG cylinder.
3. Use a spray bottle or a brush and apply a soap and water solution (half warm water and half liquid dish soap) to
all gas line connections and joints.
4. Look for bubbles. The appearance of these bubbles indicates a gas leak. Turn off the gas supply and tighten the
joint were the bubbling occurred. Turn the fuel supply back on and retest with the soapy solution once again.
Repeat this procedure until all gas leaks have been repaired.
Figure 24
Figure 25