


Special offers from our partners!

Find Replacement BBQ Parts for 20,308 Models. Repair your BBQ today.
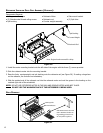
SIDE BURNER INSTALLED ONTO CART ASSEMBLY (OPTIONAL):
Components Required:
● Rolling cart with engine ● (2) Shelf gussets ● Cast side burner grill (2 pieces)
● Side Burner ● Side burner porcelain diffuser cap ● Side shelf top or corian cutting board
● (4) ” stainless steel nuts ● (10) ” x ” stainless steel bolts ● (10) ” stainless steel lock washers
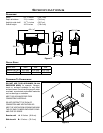
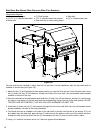
The side burner must be installed on the right side. The initial installation steps for the side burner are very similar
to the side shelf so you may refer to Figure 18.
1. Attach the two (2) shelf gussets (formed edges pointing in) onto the front and rear of the right side panel, using
four (4) bolts and four (4) lock-washers through the inside of the side shelf into pre-threaded inserts already
installed in the side of the cart.
2. Place the side burner on the shelf gussets and install four (4) bolts, four (4) lock-washers, and four (4) nuts
through the holes in the bottom lip of the side burner and the corresponding hole at the top of the shelf gussets.
DO NOT TIGHTEN THESE BOLTS ENTIRELY, THIS WILL HELP WITH ALIGNMENT FOR NEXT STEP.
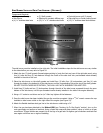
3. Install two (2) bolts and two (2) lock-washers through the side of the side burner, accessed through the open
bottom of the side burner, into the pre-threaded inserts already installed in the side of the engine assembly.
4. Using a ” socket or nut driver and a
5
/32” Allen key tighten all the fasteners.
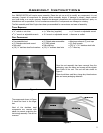
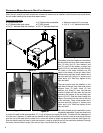
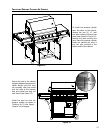
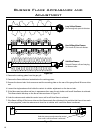
5. Once the side burner has been installed the gas line must be connected. Using a
11
/16” wrench remove the cap
installed on side burner outlet on the right side of the engine (see Figure 19).
6. Attach the exible stainless steel gas line to the side burner outlet using a ”.
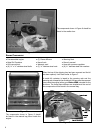
7. When the gas has been attached to the Bistro 4500 (see “Hooking Up To Gas Supply” section), turn on the
main gas supply and perform a leak test. Using a liquid dish soap and water solution, spray or brush on all gas
connections. If large bubbles are present this is the sign of a gas leak. Re-tighten gas connections and leak test
once again until there are no signs of bubbling.
11
Cap onside burner outlet
Flexible stainless steelgas line
Figure 19