


Special offers from our partners!

Find Replacement BBQ Parts for 20,308 Models. Repair your BBQ today.

15
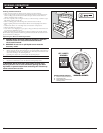
NORMAL OPERATION
Using the Rotisserie
WARNINGS:
Read all instructions before using your rotisserie.
This rotisserie is for outdoor use only.
Remove motor and store in a dry place when not in use.
Do not touch hot surfaces. Use barbecue mitts.
This rotisserie is not for use by children.
To protect against electrical hazards do not immerse cord,
plugs, or motor in water or other liquids.
Unplug the motor from outlet when not in use or before
cleaning.
Do not use rotisserie for other than intended use.
Make sure motor is OFF before placing it on the motor
bracket.
Do not operate the rotisserie motor with a damaged cord or
plug.
Do not operate the rotisserie motor if it should malfunction.
The rotisserie motor is equipped with a three prong (ground-
ing) power cord for your protection against shock hazard.
The power cord should be plugged directly into a properly
grounded three prong receptacle. If use of an extension cord
is required, be sure that it is a minimum 16 AWG, 3 wire well
insulated cord, marked for outdoor use only and properly
grounded.
When using an extension cord, make sure it is not in contact
with a hot or sharp surface.
Outdoor extension cords should be marked with the letters
“W-A” and a tag stating “Suitable for use with outdoor appli-
ances”.
Do not cut or remove the grounding prong from the rotis-
serie motor power cord.
Do not let cord hang over any sharp edge or hot surface.
Do not expose to rain.
To reduce the risk of electric shock, keep extension cord
connection dry and off the ground.
A short power cord is supplied to reduce the risk of tripping
over the cord. Extension cords may be used, but caution
must be taken to prevent tripping over the cord.
In absence of local codes the rotisserie motor must be
grounded electrically in accordance with the National Elec-
trical Code, ANSI/NFPA 70, or Canadian Electrical Code, CSA
C22.1.
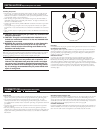
WARNING: Setup the rotisserie with food before lighting
Rotisserie Burner. Operating the Rotisserie
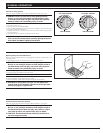
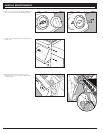
1. Remove rotisserie shaft from grill.
2. Loosen and remove right side bearing, the counterbalance and right side spit fork.
3. Push the rotisserie shaft through the center of the food.
4. Slide the right side spit fork back onto the shaft. Insert the tines of both spit forks
into the food. The food should be centered on the shaft. Tighten spit fork thumb
screws.
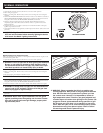
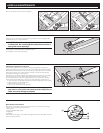
5. Place left side bearing (welded in place) groove into the left side spit rod mount
cut-out.
6. Place the right side bearing onto the spit rod and insert the pointed end of the spit
rod into the rotisserie motor.
7. Line up both the groove on the right side bearing with the right side spit rod
mount cut-out, and slide the motor over the motor mounting bracket flange and
push down. Note: The thumbscrew is only tightened when the rotisserie is not
in use. Do not tighten the thumbscrew when using so that the spit rod can rotate
freely.
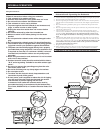
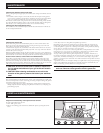
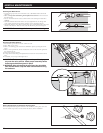
8. The rotisserie shaft should rotate so that the heavy side of the meat or poultry ro-
tates down to the bottom. Large cuts of meat may require the removal of the cook
grates to allow full rotation of the spit rod. Note: Remount the food and/or use the
counterbalance if necessary for better balance on the spit rod. The counterbal-
ance can be mounted after Step 5 above.
9. Plug the motor in and turn it on.
10. Follow Lighting Instructions. The cord can be routed through the access hole at
the back of the grill Plug cord into the accessory outlet inside the base cabinet.
CAUTION: Do not use more than 9.5A from the receptacle.