


Special offers from our partners!

Find Replacement BBQ Parts for 20,308 Models. Repair your BBQ today.
107157-01F
7
7
For more information, visit www.desatech.com
For more information, visit www.desatech.com
INSTALLATION
Check Gas Type
Electrical Hookup
Installing Hood
Assembling And Attaching Optional Brass Trim
INSTALLATION
Continued
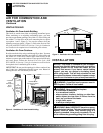
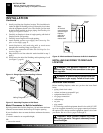
CAUTION: This fireplace creates warm air cur-
rents. These currents move heat to wall surfaces next
to fireplace. Installing fireplace next to vinyl or cloth
wall coverings or operating heater where impurities
(such as, but not limited to, tobacco smoke, aromatic
candles, cleaning fluids, oil or kerosene lamps, etc.)
in the air exist, may discolor walls or cause odors.
Note:
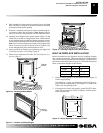
Your fireplace is designed to be used in zero clearance
installations. Wall or framing material can be placed directly against
any exterior surface on the rear, sides, or top of your fireplace,
except where standoff spacers are integrally attached. If standoff
spacers are attached to your fireplace, these spacers can be placed
directly against wall or framing materials.
Use the dimensions shown for rough openings to create the easiest
installation (see Built-In Fireplace Installation, pages 9 and 10).
IMPORTANT:
Vent-free heaters add moisture to the air. Although
this is beneficial, installing fireplace in rooms without enough
ventilation air may cause mildew to form from too much moisture.
See Air for Combustion and Ventilation, pages 4 through 6.
IMPORTANT:
Make sure the fireplace is level. If fireplace is not
level, log set will not work properly.
CHECK GAS TYPE
Use only natural gas. If your gas supply is not natural gas, do not
install fireplace. Call dealer where you bought fireplace for proper
type fireplace.
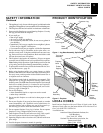
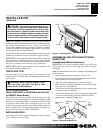
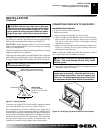
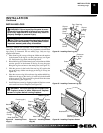
Figure 5 - Installing Hood
INSTALLING HOOD
Install hood to rail already installed in fireplace as shown in Figure
5. Use 3 Phillips screws provided.
ELECTRICAL HOOKUP
(Model VSGF28NTC or VSGF28NVA with GA3750
or GA3650T Series Blower)
This fireplace has a blower assembly with an electrical cord. The
electrical cord is five feet in length. You must locate fireplace within
reach of a 120 volt grounded electrical outlet. If not, you must install
an electrical outlet within reach of fireplace power cord. The
GA3555 outlet accessory may be used for built-in applications with
blower installed. This same information applies if installing op-
tional blower accessories to Model VSGF28NVA.
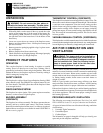
ASSEMBLING AND ATTACHING OPTIONAL
BRASS TRIM
(Included with Mantel Accessory)
IMPORTANT:
If you are recessing the firebox in a wall, do not
attach brass trim at this time. See page 9 for built-in fireplace
installation.
Note:
The instructions below show assembling and attaching brass
trim to fireplace.
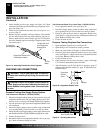
1. Remove packaging from three pieces of brass trim.
2. Locate four brass screws, two adjusting plates with set screws,
and two shims in the hardware packet.
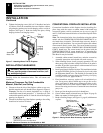
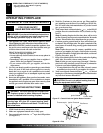
3. Align shim under adjusting plate as shown in Figure 6.
4. Slide one end of adjusting plate/shim in slot on mitered edge
of top brass trim (see Figure 6).
5. Slide other end of adjusting plate/shim in slot on mitered edge
of side brass trim (see Figure 6).
6. While firmly holding edges of brass trim together, tighten both
set screws on the adjusting plate with slotted screwdriver.
7. Repeat steps 1 through 6 for other side.
Figure 6 - Assembling Brass Trim
Screw
Hood
Rail
Side Brass
Trim
Top
Brass
Trim
Slot
Mitered Edge
Slot
Shim
Set Screws
Adjusting
Plate
WARNING: Never connect fireplace to pri-
vate (non-utility) gas wells. This gas is com-
monly known as wellhead gas.