


Special offers from our partners!

Find Replacement BBQ Parts for 20,308 Models. Repair your BBQ today.

5
107497
OWNER’S MANUAL
For more information, visit www.desatech.com
CONNECTING TO GAS
SUPPLY
Connecting to Portable 20 lb.
Propane/LP Gas Supply
CAUTION: Never connect ap-
pliance directly to the propane/
LP supply. This appliance re-
quires an external regulator. In-
stall the external regulator be-
tween the appliance and the pro-
pane/LP supply.
Use the hose/regulator assembly, tank secure-
ment bracket, tank strap, carriage bolt, wing
nut, and cable tie supplied with your appliance.
1. Thread cable tie through 2 holes in bot-
tom of tank securement bracket. Tie
should be threaded from underneath
bracket to be accessible when bracket is
in position on the ground (see Figure 2).
Do not close cable tie at this time.
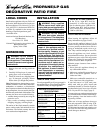
2. Position the firepit and tank securement
bracket as shown in Figure 2. Center
the appliance hose and brass fitting be-
tween the front tabs of securement
bracket. Lift the firepit and slide the rear
tabs of the bracket under the firepit. The
front tabs of the bracket will remain on
the outside of the firepit on either side
of the appliance hose.
3. Set a filled 20 lb. propane/LP tank
against the outside of the tank secure-
ment bracket with the tank valve point-
ing toward the firepit. Do not set the
tank ON the bracket (see Figure 3).
Wrap the tank strap around the tank so
that the strap tabs are facing the firepit.
Insert the carriage bolt through the strap
tab with the square hole. Tighten wing
nut securely onto bolt (see Figure 3).
4. Attach the hose/regulator assembly to
the appliance hose brass fitting (see Fig-
ure 3). Tighten firmly using a wrench.
5. Connect the POL fitting on the hose/
regulator assembly to propane/LP tank.
Turn POL fitting counterclockwise to
secure to tank. Tighten firmly using 7/8"
wrench.
IMPORTANT:
Position regula-
tor so that regulator vent is pointed down
(see Figure 3). Pointing the vent down
protects it from freezing rain or sleet.
INSTALLATION
Continued
6. Close cable tie, previously attached,
around hose and pull firmly to secure.
Cut off excess cable tie with scissors.
7. Slip the lighting and warning hang tags
between the hose and tank bracket for
easy reference.
8. Open supply valve on propane/LP tank
slowly.
Note:
If not opened slowly, ex-
cess flow check valve on propane/LP
tank will stop gas flow. If this happens,
close propane supply valve and open
again slowly.
9. Check all connections for leaks. Apply
mixture of liquid soap and water to gas
joints. Bubbles forming show a leak.
Correct all leaks at once.
10. Close propane/LP supply valve.
Note:
When operating with a full 20 lb.
tank, your firepit will run between 5 and 9
hours depending on flame setting and out-
side temperature.
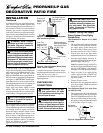
Figure 2 - Attaching Tank Securement
Bracket and Cable Tie
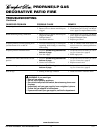
20 lb.
Propane/LP
Tank
Tank
Securement
Bracket
Firepit
Tank Strap
Carriage
Bolt
Wing Nut
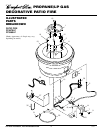
Hose/Regulator
Assembly (Regulator
Vent Pointing Down)
Cable Tie
Appliance
Hose and
Brass Fitting
Figure 3 - Connecting Appliance to Portable 20 lb. Propane/LP Gas Tank
POL Fitting
Continued
Connecting to Fixed Piping Gas
Systems (100 lb. Tank or Larger)
CAUTION: Never connect ap-
pliance directly to the propane/LP
supply. This appliance requires a
two stage external regulator (not
supplied). Install the external regu-
lator between the appliance and
the propane/LP supply.
Installation Items Needed
Before installing appliance, make sure your
installer has the items listed below.
• piping (check local codes)
• sealant (resistant to propane/LP gas)
(May be pipe dope or Teflon tape)
• equipment shutoff valve*
• test gauge connection*
• sediment trap
• tee joint
• pipe wrench
• brass fitting(s) (depending upon gas sup-
ply plumbing)
* An CSA/AGA design-certified equipment
shutoff valve with 1/8" NPT tap is an ac-
ceptable alternative to test gauge connec-
tion. Purchase the optional CSA/AGA de-
sign-certified equipment shutoff valve from
your dealer. See Accessory, page 11.
Tank Securement Bracket
Front Tabs
Rear
Tabs
Cable Tie
Appliance
Hose and
Brass Fitting
Firepit