


Special offers from our partners!

Find Replacement BBQ Parts for 20,308 Models. Repair your BBQ today.

Assembly/Set up
(cont.)
9
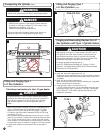
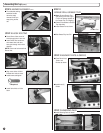
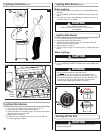
STEP 7
RIGHT SIDE TABLE
■ Remove preinstalled screws from Right Supports.
■ Install Right Side Table.
NOTE: Side Table Supports have slots for easy assembly.
■ Tighten securely.
STEP 8
LEFT SIDE BURNER
■ Remove preinstalled screws from Left Supports.
■ Install Left Side Burner Table.
NOTE: Side Table Supports have slots for easy assembly.
■ Tighten securely.
Front
of unit
Front
of unit
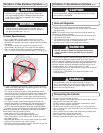
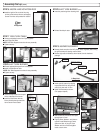
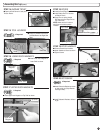
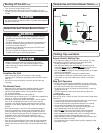
STEP 9
BURNER ASSEMBLY
Front of Unit
Washer
Bolt
■ Remove hairpin cotter from the post
on the underside of the burner.
■ Install the Side Burner with the
Burner Venturi pointing toward the
Valve Control Knob location.
■ Reinstall the hairpin cotter.
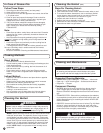
POST
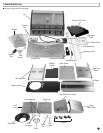
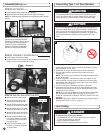
■ Remove plastic wrap from the HVR (Hose, Valve, Regulator) before lifting
the grill assembly and placing onto the frame.
■ Remove eight sets of hardware, shown below, from the hardware
package.
■ Both sections of Hose & Tee must pass
through hole in Panel.
■ Eight (8) Bolts, Washers and Nuts are
required. Install Bolts through Frame,
Spacer and side of the grill. Place
Washer and Nut on Bolt and tighten.
Install at each corner.
NUT
WASHER
SPACER
BOLT
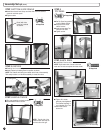
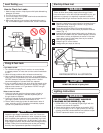
STEP 6
INSTALLING IGNITION BOX
■ Install the Ignition Box to the left front leg
(on the inside surface) with two self-tapping
screws. Two holes are provided for location.
STEP 8
LEFT SIDE BURNER (cont.)
■ Insert the post through the mounting hole.
8 Required
Nut
■ Install eight (8) spacers by aligning
keyed protrusions into the grill side
and lock in place with 1/2 turn.
■ Install Grill Assembly as shown.
(Two people required.)
2 Required
BURNER
VENTURI