


Special offers from our partners!

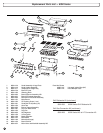
Find Replacement BBQ Parts for 20,308 Models. Repair your BBQ today.

14
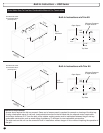
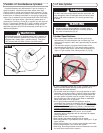
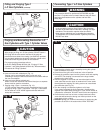
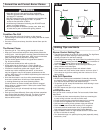
A. Hose end valve with a bleed port (Fig. 11):
Purging can be accomplished using a hose end valve
containing a bleed port which also allows for evacuation without
the use of an adapter.
B. Hose end valve without a bleed port:
When a hose end valve does not have a bleed port, a separate
device must be used for evacuation.
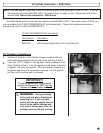
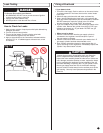
C. Purging using a Type 1 connection (Fig. 12):
L.P. Gas cylinder evacuation can be accomplished during each
purging by using a Type 1 connection. The Type 1 valve outlet
has an external 1 5/16" ACME right-hand thread which will
accept this connection.
TYPE 1
CAUTION
After purging or filling an L.P. Gas cylinder, DO NOT insert a
POL plug into the valve outlet. Insertion of the plug will
prevent the back-check from closing. Use ONLY the provided
cap and strap attached to the outlet. Close the cylinder valve
knob before returning the cylinder to the customer.
For proper purging procedures refer to:
In the US: Safety Bulletin NPGA# 133, “Purging L.P. Gas
Cylinders”, and Safety Bulletin NPGA #130, “Recommended
Procedures for Filling Cylinders”.
Purging and Evacuating Devices for L.P.
Gas Cylinders with Type 1 Cylinder Valves
Filling and Purging Type 1
L.P. Gas Cylinders (continued)
CGA-510 POL
Fig. 11
Fig. 12
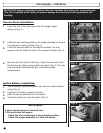
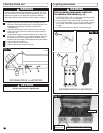
1. Check that the cylinder valve is closed by turning the cylinder
knob clockwise to a full stop.
2. Check that all the grill burner knobs are in the off position.
3. Remove the protective caps from the cylinder valve and coupling
nut. NOTE: The coupling nut connects to the large outside
threads on the valve outlet.
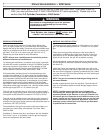
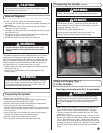
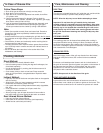
4. Hold the regulator in one hand and insert the nipple into the
valve outlet. Be sure the nipple is centered in the valve outlet.
Hand-tighten the coupling nut, taking care not to cross-thread
the connection (see Fig. 13).
5. Turn the coupling nut clockwise, tighten to a full stop.
If you cannot complete the final connection, disconnect the
regulator and repeat steps 4 through 6. If you are still unable to
complete the connection, DO NOT use this valve and regulator!
6. Check that the hose has no kinks or sharp bends and clears
areas that will become hot during use. Never put strain on the
hose where it joins a fitting.
7. BEFORE lighting grill, check all connections for leaks using the
procedure as shown in the section titled “LEAK TESTING”.
WARNING
This procedure MUST be performed OUTDOORS only! Be
sure the L.P. cylinder valve is closed. Attach to the grill. Read
and follow the directions on the cylinder and fuel hose
safety tags.
CAUTION
In the connection process, the grill side of the connection
will seal on the back-check in the valve, resulting in a slight
resistance. The connection requires about one-half to
three-quarters additional turn to complete the connection.
To disconnect, turn counterclockwise. Tighten by hand only.
DO NOT use tools.
Connecting Type 1 L.P. Gas Cylinders
Fig. 13