


Special offers from our partners!

Find Replacement BBQ Parts for 20,308 Models. Repair your BBQ today.

13
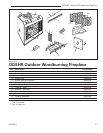
ODSHR Outdoor Woodburning Fireplace
20002264
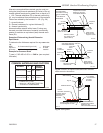
Firestop spacers are not available for, nor are they
required on, vertical walls.
The CFM Corporation chimney components have been
tested and approved with the area where the outer
pipe slides through the firestop spacer sealed with a
noncombustible caulk if desired, or left completely open
with no sealant.
Continue Installing Pipe to Complete Run
Continue attaching pipe sections to complete system
to next level always being careful that the pipe is firmly
snap locked in place before proceeding to next pipe
section.
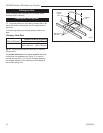
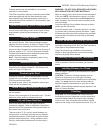
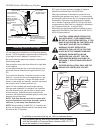
Chimney Supports
If chimney supports are required, they are installed
the same as elbows. Nail chimney support straps to
adjacent structural framing, as shown in Page 8, Figure
9. Bend straps as necessary and make sure they are
secure so they will support the weight of the chimney. A
chimney support is 2¹⁄₂" (64 mm) long when installed.
Consider this dimension when determining how many
straight chimney sections are needed.
Note: Chimney supports are generally used in long
runs in a chase installation.
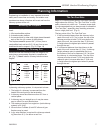
Additional Ceilings
If you encounter additional ceilings, repeat same steps
required for first ceiling installation. See firestop illus-
tration on Page 12, Figure 19.
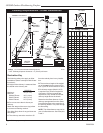
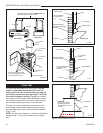
Penetrating the Roof
Run pipe to roofline. Since chimney system must be
vented to the out-of-doors, you must use an approved
CFM Corporation termination.
If a chase is used, refer to the installation manual pro-
vided with the termination cap.
Locate Chimney Centerpoint On Roof
Use same procedure detailed in locating center point of
the flue system.
Drive a nail up through roof at the center point. This will
determine center point on outside of the roof.
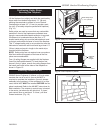
Cut and Frame Roof Hole
Size of roof hole varies with the type of chimney
termination installed. Refer to installation instructions
provided with CFM Corporation chimney termination to
find correct size of roof hole.
There must be a 2" (51 mm) air space between out-
ermost portion of chimney sections and any adjacent
combustible surfaces. (Combustible surfaces include
burnable materials such as: ceiling members, joists,
flooring, combustible insulation and roof structures.)
WARNING: DO NOT PACK REQUIRED AIR SPACES
WITH INSULATION OR OTHER MATERIALS.
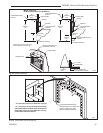
Mark an outline of the roof hole around the centerpoint
of the nail. NOTE: Hole dimensions given in the chim-
ney top installation instructions are horizontal dimen-
sions; therefore, the hole size must be marked on the
roof accordingly.
Cover the opening of the installed chimney so debris
cannot get into the system.
Cut and frame the hole. It is good practice to use fram-
ing lumber that is the same size as the rafters. Install
the frame securely because the chimney top and flash-
ing anchored to the frame must be able to withstand
heavy winds.
Install Remainder of Chimney Sections
Since you have already preplanned the height of your
termination according to the Ten Foot Rule, continue to
install pipe to the predetermined height.
Check the chimney top installation instructions for
details on how high above the roof top the chimney
sections (all pipes) should extend.
Installing Top Housing or Termination
Follow the installation instructions provided with the
CFM Corporation chimney termination you have se-
lected.
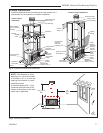
Installing Chimney In a Chase
Refer to Page 5, Figure 4 for an illustration of a typical
chase installation.
CAUTION: Treatment of firestop spacers and con-
struction of chase may vary with type of building.
These instructions are not a substitute for local building
codes. You must check your local building codes to
determine specific requirements for your city or state.
NOTE: Other building materials may be required in ad-
dition to Firestop Spacers.
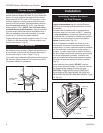
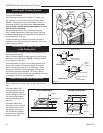
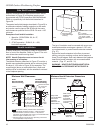
Finishing
CAUTION: All joints between the finished wall and
the fireplace surround (top/sides) must be sealed with
noncombustible material to prevent cold air leakage
into the room. Only noncombustible material may be
applied to the facing of the fireplace surround. (Fig. 20)