


Special offers from our partners!

Find Replacement BBQ Parts for 20,308 Models. Repair your BBQ today.

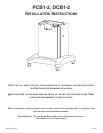
B101586-4-0112Page 8
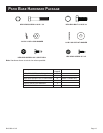
Caution: Be careful when handling parts, as they may
contain sharp edges. Work gloves are recommended to prevent
injury. Remove protective plastic covering.
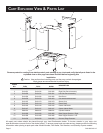
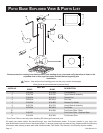
1. For Stationary Cart Assembly: Use the template on page
23 to locate and pre-drill the three screw holes into wood or
concrete for the cart base. If applicable, drill the 1 1/2” gas line
access hole. DO NOT secure base with the screws at this time.
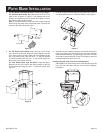
For Mobile Cart Assembly: Flip plastic base and insert casters
by inserting the pin provided with the casters in the proper hole.
It is recommended that the two casters with brakes should be
in the front of the base. See Figure 1.
Figure 1
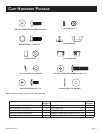
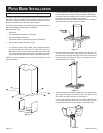
2. Place the base support brackets on the side panels. Slide the
short anges on the brackets between the top and side anges
of the side panels. See Figure 2.
Figure 2
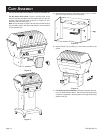
CArt ASSEmbly
3. Align the holes on the front and side panel assemblies and
secure with six #10-24 x 1/2” Phillips screws and 10-24 Keps
Nuts provided (3 on each side). Do not tighten these screws
until all are installed. Use black screws for black carts and
stainless steel screws for stainless steel carts. See Figures 2
and 3.
Figure 3
4. Secure the completed assembly to the base with four
1/4-20 x 3/4” Phillips Truss screws. See Figure 4. Note: Plastic
base comes with factory installed threaded inserts. Install all
four screws before tightening.
Figure 4