


Special offers from our partners!

Find Replacement BBQ Parts for 20,308 Models. Repair your BBQ today.
7
WARNING
•• NNeevveerr uussee yyoouurr ggrriillll wwiitthhoouutt lleeaakk tteessttiinngg aallll ggaass ccoonnnneeccttiioonnss aanndd hhoosseess.. SSeeee tthhee sseeccttiioonn oonn
""LLeeaakk T
Teessttiinngg"" iinn tthhiiss mmaannuuaall ffoorr pprrooppeerr pprroocceedduurreess..
TThhee pprreessssuurree rreegguullaattoorr aanndd hhoossee aasssseemmbbllyy ssuupppplliieedd wwiitth
h yyoouurr ggaass ggrriillll mmuusstt bbee uusseedd..
•• DDOO NNOOTT aatttteemmpptt ttoo ccoonnnneecctt iitt ttoo aannyy ootthheerr ffuueell ssuuppppllyy ssoouurrccee ssuucchh aass a
a nnaattuurraall ggaass lliinnee..
•• DDOO NNOOTT uussee aannyy ootthheerr pprreessssuurree rreegguullaattoorr//hhoossee aasssseemmbbllyy ootthheerr tthhaann tthhee oonnee ssuupppplliieed
d wwiitthh yyoouurr ggrriillll..
RReeppllaacceemmeenntt pprreessssuurree rreegguullaattoorr//hhoossee aasssseemmbbllyy mmuusstt bbee ppaarrtt NNoo 115555--66441199--22,, wwhhiicchh ccaan
n bbee oobbttaaiinneedd
bbyy ccoonnttaaccttiinngg ccuussttoommeerr sseerrvviiccee aatt 880000--552277--00771177..
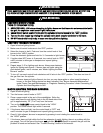
•• DDOO NNOOTT aatttteemmpptt ttoo aaddjjuusstt oorr rreeppaaiirr tthhee
rreegguullaattoorr.. TThhee rreegguullaattoorr iiss ddeessiiggnneedd ttoo ooppeerraattee aatt aa
mmaaxxiimmuumm oouuttppuutt pprreessssuurree ooff 1111 iinncchheess ooff wwaatteerr c
coolluummnn ((22..7744 kkPPaa))..
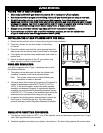
During assembly and/or replacement of the gas cylinder, keep the gas supply hose free of kinks and/or
damage.
Visually inspect the hose assembly prior to each use for evidence of damage, excess wear, or
deterioration. If found, replace the assembly before using your grill. Only the manufacturer's supplied
replacement should be used.
CCOONNNNEECCTTIINNGG HHOOSSEE AANNDD RREEGGUULLAATTOORR TTOO AANN LLPP GGAASS CCYYLLIINNDDEERR
•• EEnnssuurree tthhee ttaannkk vvaallvvee iiss
CLOSED
pprriioorr ttoo ccoonnnneeccttiinngg tthhee LLPP ggaass ccyylliinnddeerr ttoo yyoouurr ggrriillll.. TTuurrnn tthhee
vvaallvvee kknno
obb cclloocckkwwiissee ttoo pprrooppeerrllyy cclloossee tthhee vvaallvvee.. RReeaadd aanndd ffoollllooww aallll iinnssttrruuccttiioonnss aanndd wwaarrnniinnggss
oonn tthhee ssuupppplly
y hhoossee ssaaffeettyy ttaaggss.. RReeaadd aanndd ffoollllooww aallll wwaarrnniinnggss iinn tthhiiss mmaannuuaall ccoonncceerrnniinngg tthhee ssaaffee
uussee ooff LLPP ggaass ccyyl
liinnddeerrss aanndd tthhee hhoossee aanndd rreegguullaattoorr bbeeffoorree ccoonnnneeccttiinngg ccyylliinnddeerr ttoo ggrriillll.. RReeaadd
aanndd ffoollllooww aallll wwaarrnniinnggss
oonn tthhee LLPP ccyylliinnddeerr..
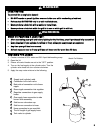
CCOONNNNEECCTTIINNGG HHOOSSEE AANNDD RREEGGUULLAATTOORR
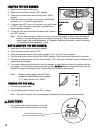
1. Check that the cylinder valve is closed by turning the knob clockwise.
2. Check that the grill’s burner control knobs are in the "OFF" positions.
3. Remove the protective plastic cap from the cylinder valve and the connection device.
4. Hold regulator and insert the nipple of connection device into the LP cylinder valve outlet. Ensure that
the device is centered properly.
5. Turn the large coupling nut clockwise by hand and tighten to a full stop. Take care not to cross thread
the coupling nut onto the cylinder valve. Do not over-tighten the knob onto the valve. Do not use tools
to tighten connection.
Note: If you are unable to make the connection, repeat Steps 4 and 5.
6. Check that the hose does not contain kinks, does not contact sharp edges, and does not contact
surfaces that may become hot during use.
7. Leak check all fittings before lighting your grill. See section on "Leak Testing" in this manual.
WARNING
WARNING