


Special offers from our partners!

Find Replacement BBQ Parts for 20,308 Models. Repair your BBQ today.

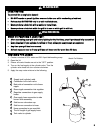
LLIIGGHHTTIINNGG IINNSSTTRRUUCCTTIIOONNSS::
FFoollllooww tthhee iinnssttrruuccttiioonnss eexxaaccttllyy..
11.. OOPPEENN TTHHEE GGRRIILLLL LLIIDD bbeeffoorree aatttteemmppttiinngg ttoo lliigghhtt aa bbuurrnneerr ssoo tthhaatt ffuumme
ess ddoo nnoott aaccccuummuullaattee iinnssiiddee
tthhee ggrriillll.. AAnn eexxpplloossiioonn ccoouulldd ooccccuurr iiff ggrriillll lliidd iiss ddoowwnn..
22.. CChheecckk tthhaatt aal
lll bbuurrnneerr ccoonnttrrooll kknnoobbss aanndd tthhee ccyylliinnddeerr vvaallvvee aarree ttuurrnneedd ttoo tthhee ""OOFFFF"" ppoossiittiioonn..
33.. TTuurrnn oonn tthhee ffuueell s
suuppppllyy bbyy rroottaattiinngg tthhee ccyylliinnddeerr vvaallvvee kknnoobb ccoouunntteerr--cclloocckkwwiissee ttoo ffuullll ooppeenn..
44.. DDOO NNOOTT ssttaanndd wwiitthh hheeaadd,,
bbooddyy,, oorr aarrmmss oovveerr tthhee ggrriillll wwhheenn lliigghhttiinngg..
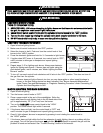
LLIIGGHHTTIINNGG TTHHEE MMAAIINN BBUURRNNEERRSS::
1. Open lid before lighting burner.
2. Make sure all control knobs are in the "OFF" position.
3. Select the burner to be lit. Push and turn the control knob of that
burner to the "HIGH" position.
4. Press the electronic igniter and hold for 3–5 seconds to light burner.
5. If ignition does NOT occur in 5 seconds, turn control knob to "OFF",
wait 5 minutes to allow gas to dissipate and repeat lighting
procedure.
6. Repeat steps 3–5 for lighting each burner. Always use electronic
igniter for lighting each burner. If burner does not ignite using the
push-button igniter, wait 5 minutes, see "Match Lighting the Main
Burners" section.
7. To turn off, turn each control knob clockwise until it locks in the "OFF" position. This does not turn off
the gas flow from the cylinder.
Note: If burner does not light or flame is too low, you may have spider or other insect blockage in
burner, or the flow limiting device has been activated. See "Burner Assembly/Maintenance"
under Proper Care and Maintenance, or "Regulator Resetting Procedure" under Connecting LP
Cylinder and Hose/Regulator to Grill.
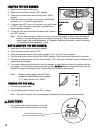
MMAATTCCHH LLIIGGHHTTIINNGG TTHHEE MMAAIINN BBUURRNNEERRSS::
1. Open lid before lighting.
2. Turn the burner control knobs to "OFF".
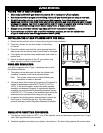
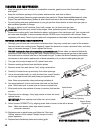
3. Place a paper match in the end of the matchlighter. Strike the
match and place through lighting hole in the left hand side of the
grill to approximately 1/2" (1 to 2 cm) from the burner.
4. Turn on the
FFAARR LLEEFFTT
burner control knob to the "HIGH"
position. The burner should light within 5 seconds.
5. If the burner does not light, turn the control knob to "OFF" and
wait 5 minutes for gas to dissipate and repeat lighting procedure.
6. Once lit, light adjacent burners in sequence by pressing in and rotating the control knob to
the "HIGH" position.
7. If the burner does not light within the first few attempts of match lighting, there is a problem with the
gas supply. Turn off the gas at the burner
aanndd
cylinder.
DDOO NNOOTT
attempt to operate the grill until the
problem is found and corrected. See "Trouble Shooting" section of this manual.
WARNING
10
WARNING
RReeaadd,, uunnddeerrssttaanndd aanndd ffoollllooww aallll wwaarrnniinnggss aanndd iinnssttrruuccttiioonnss ccoonnttaaiinneedd iinn tthhiiss mmaannuuaall.. DDOO NNOOTT sskkiipp
aannyy
ooff tthhee wwaarrnniinnggss aanndd iinnssttrruuccttiioonnss ccoonnttaaiinneedd iinn tthhee pprreecceeddiinngg sseeccttiioonnss ooff tthhiiss mmaannuuaall..
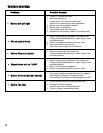
Lighting Hole
Matchlighter