Special offers from our partners!

Find Replacement BBQ Parts for 20,308 Models. Repair your BBQ today.

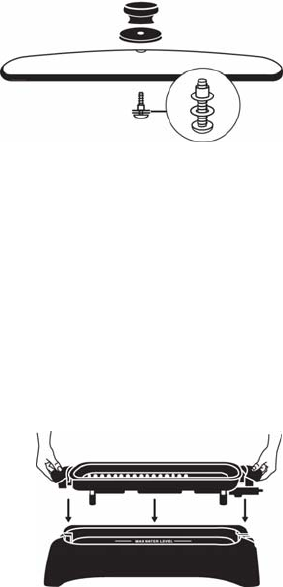
Cover Knob Assembly:
5
1. Position the disc and cover knob on the
topside of the cover aligning the hole in
the disc and cover knob with the hole in
the cover.
2. Insert the screw with the washer and
plastic sleeve attached, through the cover
hole into the knob. Tighten with a screwdriver until secured. Do not over tighten
to prevent stripping of threads. Do not use the cover without the cover knob
attached.
Grill Assembly:
• Always use the grill on a dry, level, heat-resistant surface, away from any
edge. Never use the grill without the drip pan in base. Do not use the grill
unless securely positioned in the base.
1. Place the drip pan in to the base. Fill the drip pan with water to the maximum
water level line, about 3 cups.
2. Position the grill on to the base with the handles in the recessed areas of the
base. The grill may be positioned with the control to the left or right end of the
base.
3. With the heat control set at the “OFF” position,
plug the cord into a 120 volt, AC electrical
outlet only.
4. Preheat the grill, uncovered, at the
recommended setting for the food being
cooked. Refer to the grilling chart in this
manual or on the handle for selecting the heat setting and grilling times.
5. When the signal light on the heat control goes out indicating the grilling
temperature has been reached, add the food. If desired, the cover may be
placed on the grill to shorten the cooking time and help contain spatters. The
heat may be increased or decreased, depending upon personal preference and
the type or amount of food being prepared. The signal light will go on and off
periodically to indicate the proper temperature is being maintained.
6. Use hot pads when handling the grill and cover as the handles become warm.
For turning food, nylon, plastic or wooden cooking tools are recommended for
use on the non-stick surface. Do not use sharp edged cooking tools or knives.
7. When grilling is completed, set the heat control at “WARM” for serving, or set
the dial at “OFF” if food will be removed immediately from the grill. After the dial
is set to “OFF,” unplug the cord from the wall outlet. Let the grill cool completely
before removing the heat control.
8. Unplug the cord from the electrical outlet after use and allow the grill to cool
completely before cleaning.
9. Do not allow children to use the grill or be around the grill, as the outside
surfaces of the grill are hot during use.


