


Special offers from our partners!

Find Replacement BBQ Parts for 20,308 Models. Repair your BBQ today.
Buy Weber Grill Parts. It couldn't be easier. Find your Weber parts here.

B-5
(1)
(2)
(3)
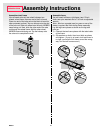
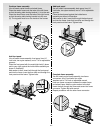
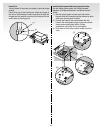
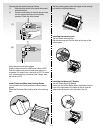
Install igniter
Note - The igniter wires are already attached to the
Gas Catcher Ignition Chamber and the igniter. This
was done to factory test the ignition system.
The igniter lock nut is on the igniter.
1) Loosen the igniter lock nut.
2) Insert the top of the igniter up through the large
part of the keyhole in the frame brace. Slide the
igniter into the small part of the keyhole.
3) Tighten the igniter lock nut back onto the igniter.
Note - If the igniter works loose, carefully tighten the
igniter lock nut with an adjustable wrench or pliers.
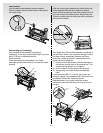
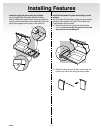
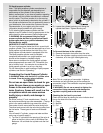
Check that all burner valves are off
You will need: burner control knobs.
Valves are shipped in the OFF position, but you should
check to be sure that they are turned OFF. Put the
knob on each valve. Check by pushing down and
turning clockwise. If they do not turn, they are off.
Proceed to the next step. If they do turn continue
turning them clockwise until they stop, then they are
off. Proceed to the next step.
(1) (2)
(1)
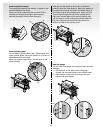
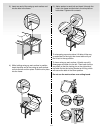
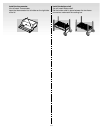
Install the slide out bottom tray
You will need: the slide out bottom tray(1), catch pan
holder(2), catch pan and one disposable drip pan.
Hook the ends of the catch pan holder into the hole in
the slide out bottom tray. The front of the catch pan
holder must be on the same side as the finger
grip(1) of the bottom tray.
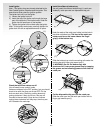
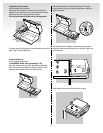
(1)
Slide the bottom tray onto the mounting rails under the
cooking box with finger grip toward you(1).
ƽ WARNING: Do not line bottom tray with
aluminum foil. It can cause grease fires by trapping
the grease and not allowing grease to flow into the
catch pan.
Put the disposable drip pan into the catch pan.
Slide the catch pan into the catch pan holder with its
finger grip towards you(1).