


Special offers from our partners!

Find Replacement BBQ Parts for 20,308 Models. Repair your BBQ today.
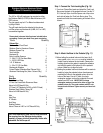
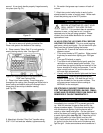
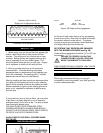
around. It is a sturdy handle properly hinged securely
into place (see Fig. 31).
17
Figure 31
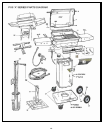
FINISH ASSEMBLY
1. Be sure to remove all plastic protective film.
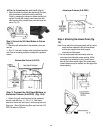
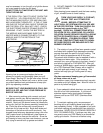
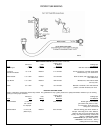
Place rock grate in the bottom of the casting.
2. Place ceramic "Moon Rok II" on rock grate by
evenly placing side by side. See figure 32
4
Figure 32 Proper placement of rock grates and "Moon
ROK” and Cooking Grids
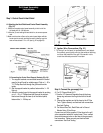
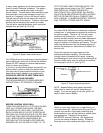
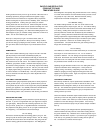
3. Place lid on lower casting. Insert hinge pins
through top lid casting, then through pre-drilled hole in
lower casting and attach cotter pins through hole in
hinge pins to secure top to bottom casting
(see Fig. 33).
1
Figure 33 Hinge Pins/Cotter Pins
5. Attach twin lid sides "Stay Cool" handles using
5/16" X 3/4" bolt and star washer, tighten securely.
. Be certain that grease cup is secure in back of
. Attach two control valve knobs to end of valve
rk
6
column.
7
stems located in center of control panel. White ma
should be pointing up to the OFF position.
LIGHTING YOUR GRILL
ive
abrasion
e
LWAYS OPEN THE LID COMPLETELY BEFORE
r
sure it
s to OFF position. Either control
gas ON at tank or supply.
gently push the
lights and the flame
BEFORE ATTEMPTING TO LIGHT YOUR
GRILL, INSPECT THE HOSE OR GAS
SUPPLY. If it is evident there is excess
or wear, or the hose is cut, it must be
replaced prior to the grill being operated. Pleas
contact your local dealer/distributor for an exact
replacement hose.
A
LIGHTING THE BURNER. This is to avoid trapping
gas fumes, which could ignite. Do not stand with you
head over the grill when lighting the burner.
Open the lid. Examine the interior to be
appears normal.
Turn control knob
knob may be used when lighting your PGS gas
grill.
Turn
Turn either knob to Medium and
red button on control panel ignitor module. You
should hear the ignitor clicking and one half of the
burner should be lit within four seconds. Turn the
other control knob on “HI” and the other burner
will cross light automatically.
Visually verify that the burner
is acceptable. Close the grill top and let the
ceramic rocks get hot. Pre-heat the grill on H
with the lid down for five to seven minutes. This
will ensure even heat and allow cooking at
MEDIUM, for the most part.
I
E STRONGLY SUGGEST OBSERVING GRILL
W
FOR TWO MINUTES BEFORE LEAVING. SMALL
LEAKS AND OR SPIDER FIRES CAN EASILY BE
REMEDIED IF CAUGHT IMMEDIATELY.
IF THE BURNER FAILS TO LIGHT
mediately turn controls OFF to prevent gas build-
t
d
is
ch
Im
up. Wait five minutes for gas to clear and try the
above procedure again. If the burner does not ligh
with the electronic ignition, light the burner with a
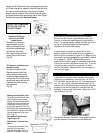
match or other hand held ignitor. On the right han
side of the lower grill casting, near the bottom, there
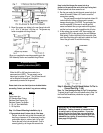
a match lighting hole (see Fig. 34). Raise the grill lid.
Light a long match (or other ignitor) and turn the
RIGHT hand control knob to HI. Insert the lit mat
(or ignitor) into the hole to the end of the burner and
light the grill. Under some adverse wind conditions it