


Special offers from our partners!

Find Replacement BBQ Parts for 20,308 Models. Repair your BBQ today.

www.oster.com
www.oster.com
8
9
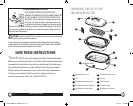
8. Wood chip bins are removable for easy cleaning. Please do
not remove while HOT. Allow unit to cool before removing.
WARNING: The Smoker Roaster is hot. Always use hot pads or
oven mitts and remove the lid carefully to allow steam and
smoke to escape away from you.
NOTE: For greater accuracy, use a meat thermometer to check
for doneness. Place the probe of thermometer in thickest area of
meat.
If the meat is not done, replace the lid and continue checking
for doneness at 30-minute intervals. When meat is done, turn
the temperature dial to MIN, and unplug the Smoker Roaster.
Remove the meat from rack.
ROASTING
1. Add water into the Pan in order to keep the food moist while
cooking.
2. Place the rack into the roasting pan. Place the food on the
rack and cover with the lid.
3. Plug the cord into a properly grounded 120-volt AC outlet. Be
sure the outlet holds the plug rmly and is not corroded.
WARNING: To ensure continued protection against shock
hazard, connect to a properly grounded outlet. DO NOT
operate the Smoker Roaster in the rain or on a damp surface.
DO NOT USE AN ORDINARY HOUSEHOLD EXTENSION CORD
WITH THIS SMOKER ROASTER. Use only a heavy-duty 14
gauge 3-wire grounded cord not more than 12 ft. long.
4. Turn the temperature dial to the temperature suggested in
the recipe. The indicator light illuminates. The temperature
range for roasting is 300 °F to 350 °F.
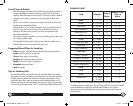
5. Allow the food to cook. Refer to the roasting chart on page
17 for approximate cooking times. (The chart is based on
outdoor temperatures above 60 °F. In colder weather,
cooking times will increase. Cooking times should also be
increased for altitudes above 3500 ft.)
6. When the recommended cooking time is complete, remove
the lid and check for doneness.
HOW TO USE:
NOTE: Before operating, make sure unit is not plugged in and is
cool before starting.
1. Remove the lid and place about ⁄ cup of dry wood chips into
each of the wood chip bins. NEVER PLACE WOOD CHIPS
DIRECTLY INTO THE HOUSING. Do not use Wood Chunks. This
will damage the unit.
2. Add water or broth to the bottom of the pan if extra moisture
is desired.
3. Place the rack into the roasting pan, place the food on the
rack, and cover with the lid.
4. Plug the cord into a properly grounded 120-volt AC outlet. Be
sure the outlet holds the plug rmly and is not corroded.
WARNING: To ensure continued protection against shock
hazard, connect to a properly grounded outlet. DO NOT
operate the Smoker Roaster in the rain or on a damp surface.
DO NOT USE AN ORDINARY HOUSEHOLD EXTENSION CORD
WITH THIS SMOKER ROASTER. Use only a heavy-duty 14
gauge 3-wire grounded cord not more than 12 ft. long.
5. Power indicator light should illuminate, turn the temperature
dial to desired temperature.
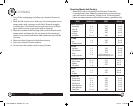
6. Allow the food to cook. Refer to the smoking chart on page
13 for approximate cooking times. (The chart is based on
outdoor temperatures above 60 °F. In colder weather,
cooking times will increase. Cooking times should also be
increased for altitudes above 3500 ft.)
NOTE: It is normal to see and smell smoke escaping from the
Smoker Roaster. The smoke will be visible approximately 30
minutes into the cooking cycle and may decrease after the
rst hour of cooking. Do not add more chips.
7. When the recommended cooking time is complete, remove
the lid and check for doneness.
CKSTROSMK18_12ESM1.indd 8-9 6/11/12 11:09 AM