


Special offers from our partners!

Find Replacement BBQ Parts for 20,308 Models. Repair your BBQ today.

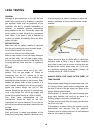
USING THE SIDE BURNER
WARNING: IMPORTANT!
USING THE SIDE BURNER:
Inspect the gas supply hose prior to turning the
gas “ON”. If there is evidence of cuts, wear o
r
abrasion, it must be replaced prior to use. Do no
t
use the side burner if the odor of gas is present.
CARE & MAINTENANCE
STAINLESS STEEL
The grill is made from non-rusting and
non-magnetic stainless steel. There are many
different stainless steel cleaners available.
A
lways use the mildest cleaning procedure first,
scrubbing in the direction of the grain. To touch
up noticeable scratches in the stainless steel,
sand very lightly with dry 100 grit emery paper in
the direction of the grain. Specks of grease can
gather on the surfaces of the stainless steel and
bake on to the surface and give the appearance
of rust. For removal use an abrasive pad in
conjunction with a stainless steel cleaner.
GRILL RACK
The easiest way to clean the grill is immediately
after cooking is completed and after turning of
f
the flame. Wear a barbeque mitt to protect you
r
hand from the heat and steam. Dip a brass
bristle barbeque brush in tap water and scrub the
hot grill. Dip the brush frequently in the bowl o
f
water. Steam, created as water contacts the hot
grill, assists the cleaning process by softening
any food particles. The food particles will fall and
burn. If the grill is allowed to cool before
cleaning, cleaning will be more difficult.
ENSURE THAT THE GAS SUPPLY AND TH
E
KNOBS ARE IN THE “OFF” POSITION. MAKE
SURE THE RANGETOP BURNER IS COO
L
BEFORE REMOVAL.
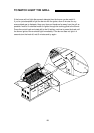
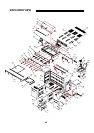
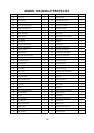
GRILL BURNERS
Extreme care should be taken when moving a
burner as it must be correctly centered on the
orifice before any attempt is made to relight the
grill. Frequency of cleaning will depend on how
often you use the grill.
GRILL BURNER CLEANING
Ensure the gas supply is off and the knobs are in
the “OFF” position. Make sure the grill is cool.
Clean the exterior of the burner with a wire brush.
Clear stubborn scale with a metal scraper. Clea
r
any clogged ports with a straightened paper clip.
Never use a wooden toothpick as it may break of
f
and clog the port. Please note if insects or othe
r
obstructions are blocking the flow of gas through
the burner, and if so you will need to call ou
r
customer service line: 1-800-913-8999.
GREASE TRAY CLEANING
The grease tray should be emptied and wiped
down periodically and washed in a mild detergent
and warm water solution. A small amount of sand
or cat litter may be placed in bottom of grease tray
to absorb the grease. Check the grease tray
frequently, don’t allow excess grease to
accumulate and overflow out of the
g
rease tra
y
.
WARNING: Always keep your face and body
as far away from the burner as possible when
lighting.
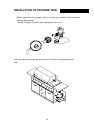
LIGHT INSTRUCTION
To light the side burner, remove any cooking
utensils from the burner grate. Push and turn the
control knob counterclockwise to the “HI” position.
If the burner does not light, turn the control knob to
“OFF”. If the smell of gas is detected and the ignite
r
is not functioning, immediately turn the control knob
“OFF”. Allow 5 minutes for any accumulated gas to
dissipate. If the side burner igniter is not
functioning, see the following section for match
lighting.
MATCH LIGHTING
Hold a lit extended match or lighter near the side
burner ports, turn the control knob
counterclockwise to “HI”. Move your hand
immediately once the burner is lit. Rotate the
control knob to the desired setting.
16