Special offers from our partners!

Find Replacement BBQ Parts for 20,308 Models. Repair your BBQ today.

25
GAS APPLIANCE INSTALLATION
CAUTION: If an unvented gas appliance is installed in the fireplace, the gas appliance must only be operated
with the fireplace glass door fully open (if included). Only unvented gas log set which have been found to
comply with the standard for unvented room heaters, ANSI/IAS/AGA Z21.11.2, are to be installed in this
fireplace.
WARNING: Do not operate an unvented gas log set in this fireplace with the chimney removed.
The installer of the fireplace and gas appliance must describe the operation of the fireplace and appliance
to the people who will be operating them and leave all instruction manuals with the operator of the appliance.
2. An approved gas shut off valve must be located outside the fireplace in an area accessible to the users of
the fireplace.
3. All gas piping and fitting must be either steel or malleable iron. Unions must be of the ground joint type.
4. Some code authorities prohibit or place restrictions on the use of gas appliances in fireplaces. Check with
local code authorities before proceeding with the installation.
5. The gas appliance and all connecting gas piping should only be installed by a licensed gas appliance
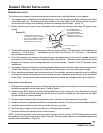
installer. See Figure 28 for the gas line opening dimensions on the fireplace.
6. The installer should advise the persons who will use the appliance to set the fireplace damper in the full
open position when the appliance is in use.
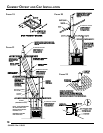
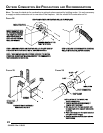
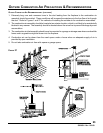
7. See Figures 29 and 30 for acceptable combustible mantel locations if an unvented gas appliance is being
installed in the fireplace. See Figure 31 for acceptable combustible mantel location if the fireplace is being
installed to burn wood.
The following instructions only apply to passing the gas line through the fireplace wall. Follow the instructions
provided by the appliance for the gas line, testing and adjusting it.
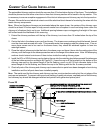
1. Locate the recessed area in the side refractory panel as shown by Figure 28.
2. Tap out a round hole in the brick liner with a hammer by tapping lightly on the recessed area.
3. Remove the two screws that hold the cover plates on the jacket wrap and discard the cover plate.
4. Use a screwdriver or similar tool to push the loose insulation out of the tube between the firebox and the
outer jacket of the fireplace.
5. Install the gas pipe through the tube between the firebox and jacket.
6. Attach the gas appliance to the gas pipe according to the appliance makers instructions.
7. Pack the insulation removed in step 4 around the pipe to prevent air flowing through the tube either into or
out of the firebox.
8. Be sure the gas is turned off at the appliance, then turn the gas on at the cut off valve and test the gas line
connections for leaks with soapy water solution or a liquid leak detector. DO NOT USE A MATCH OR
OTHER FLAME SOURCE TO CHECK FOR GAS LEAKS. If a gas leak is detected, turn the gas off
immediately and fix the leak.
9. Proceed with testing the appliance for leaks and adjusting it as required by the manufacturer instructions.
53D9031. Rev 1 03/03


